
Planning a trip to Southern Utah? You’re in for an unforgettable adventure. Southern Utah is home to some of the best hikes in the world, with Utah hiking trails ranging from easy nature walks to challenging all-day treks. In this guide, we organize Southern Utah hikes by region – including Zion National Park, Bryce Canyon, Arches, Capitol Reef, Grand Staircase–Escalante, Snow Canyon, Red Cliffs Desert Reserve, and other gems – so that every hiker can find a trail that fits their ability and interests. Each section below highlights a mix of easy, moderate, and strenuous hikes. For each hike, you’ll find the trail length, difficulty, best seasons, what to bring, notable features, and any permit or fee information. Our tone here is warm and informative, because we want you to feel prepared (with a dash of excitement!) as you hit the red rock trails. Let’s get started exploring these stunning regions of Southern Utah. Check out Slot Canyons in Utah.
The Complete Guide to Southern Utah Hikes
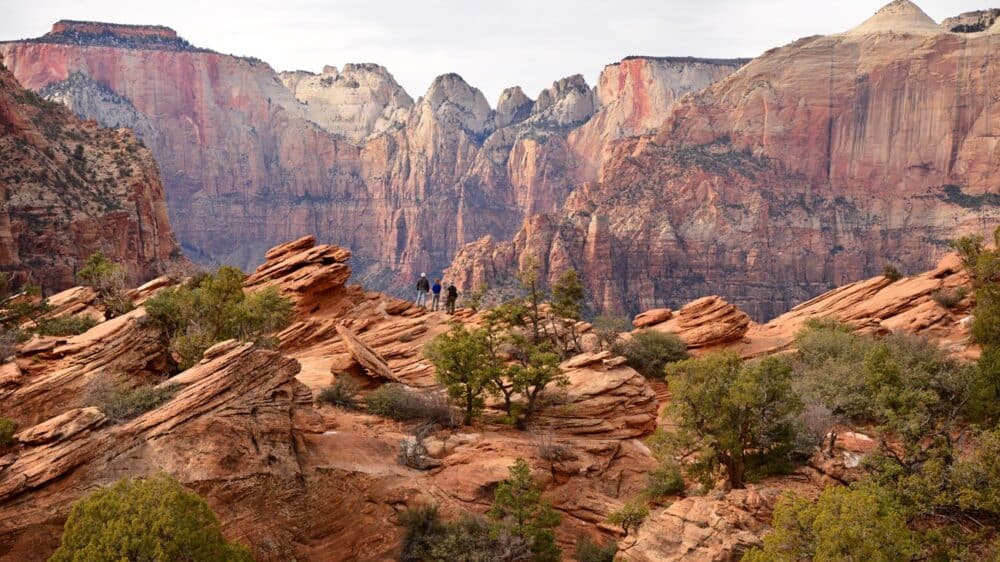
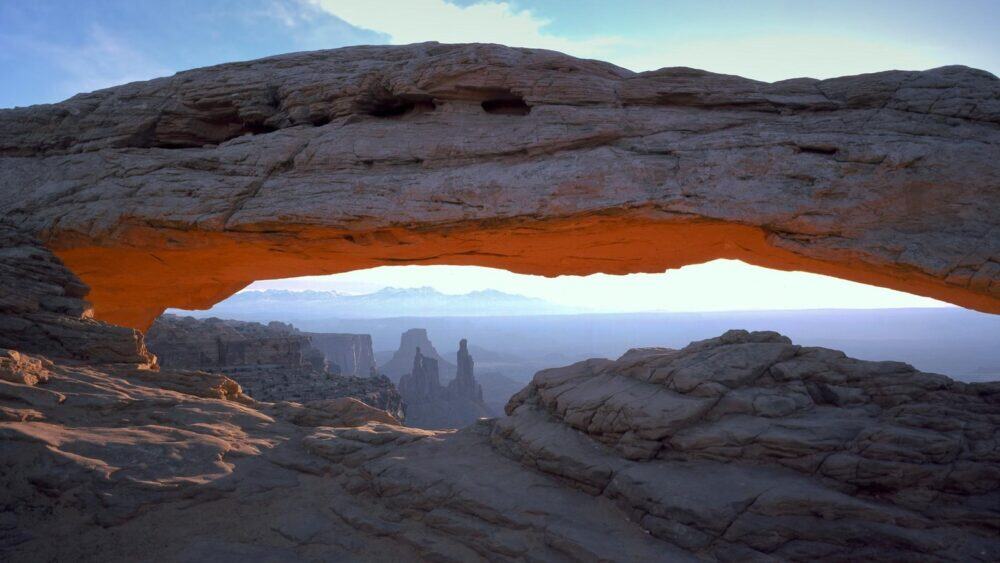
Zion National Park (Southwest Utah)
Zion National Park is a crown jewel of Southern Utah, famous for its towering sandstone cliffs and narrow river canyons. This park offers trails for every hiker, from flat riverside strolls to heart-pounding ridge climbs.
Best seasons: Spring and fall offer mild weather. Summer is beautiful but hot (be prepared for heat and afternoon storms), and winter brings fewer crowds but some icy trails.
What to bring: plenty of water, sun protection (hat, sunscreen), sturdy shoes (with good grip for slickrock), and a camera for the incredible views. Note that Zion requires a park entrance fee, and some popular hikes now require permits. Below are a few must-do hikes in Zion:
Easy: Riverside Walk (Zion Canyon)
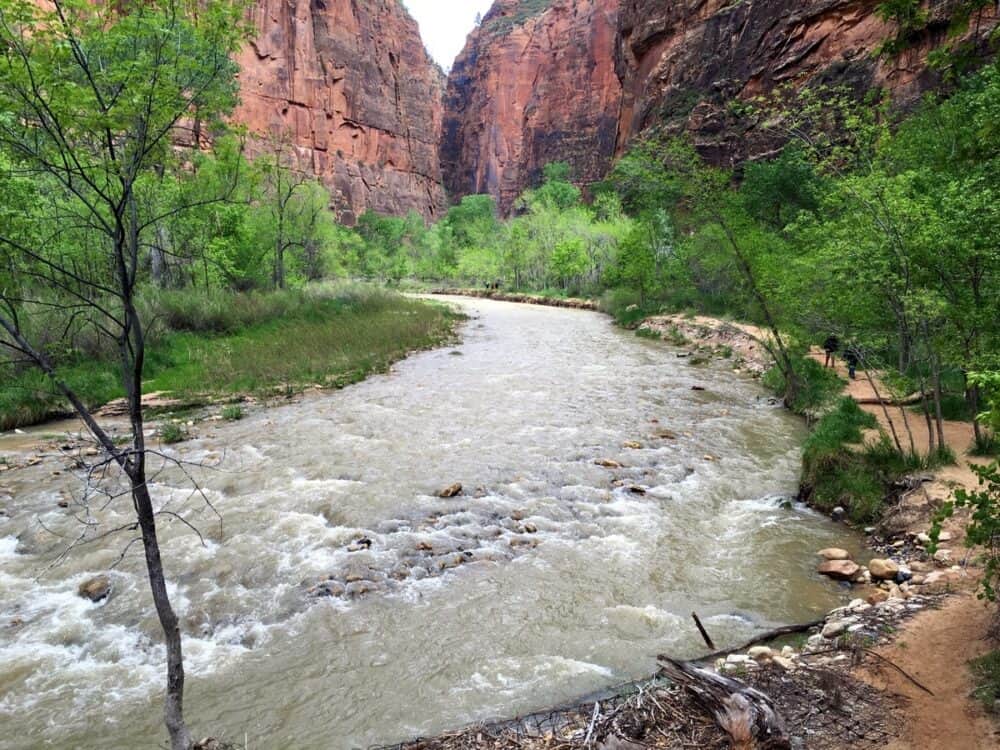
- Length: 2.0 miles round trip
- Difficulty: Easy (paved path, minimal elevation gain)
- Best Seasons: Year-round (spring through fall ideal for comfortable temps)
- What to Bring: Water (there’s a refill station at the trailhead), comfortable walking shoes, sun protection. In warmer months, consider water shoes if you plan to step into the river.
- Notable Features: Follows the Virgin River along the bottom of a narrow canyon, with lush hanging gardens on the cliff walls. It’s a shaded, family-friendly hike perfect for all ages. At the end of Riverside Walk, you reach the start of The Narrows (Zion’s famous slot canyon river hike).
- Permits/Fee: No permit needed for Riverside Walk. (If you venture beyond into The Narrows beyond Big Spring, a permit is required, but bottom-up Narrows day hikes require no permit.) Zion NP entry fee or pass is required.
Moderate: Canyon Overlook Trail
- Length: 1.0 mile round trip
- Difficulty: Moderate (short but with some uneven steps and drop-offs; mostly fenced for safety)
- Best Seasons: Year-round (morning or late afternoon for shade; can be hot mid-day in summer, watch for ice in winter)
- What to Bring: Sturdy shoes (trail is rocky), water, and a flashlight if hiking near dusk (the trail is not lit). No restrooms at trailhead (pit toilets are 0.25 mi east of trailhead).
- Notable Features: A quick hike to one of Zion’s best viewpoints. The trail climbs to a perch overlooking lower Zion Canyon and Pine Creek Canyon. You’ll get a stunning panorama of red cliffs and the road snaking below. It’s a great short hike if you can’t do longer trails but want a big payoff.
- Permits/Fee: No permit required. You must drive through the Zion-Mount Carmel Tunnel to reach the trailhead (no shuttle service here). Park in the small lot just east of the tunnel (parking is very limited). Zion entry fee applies.
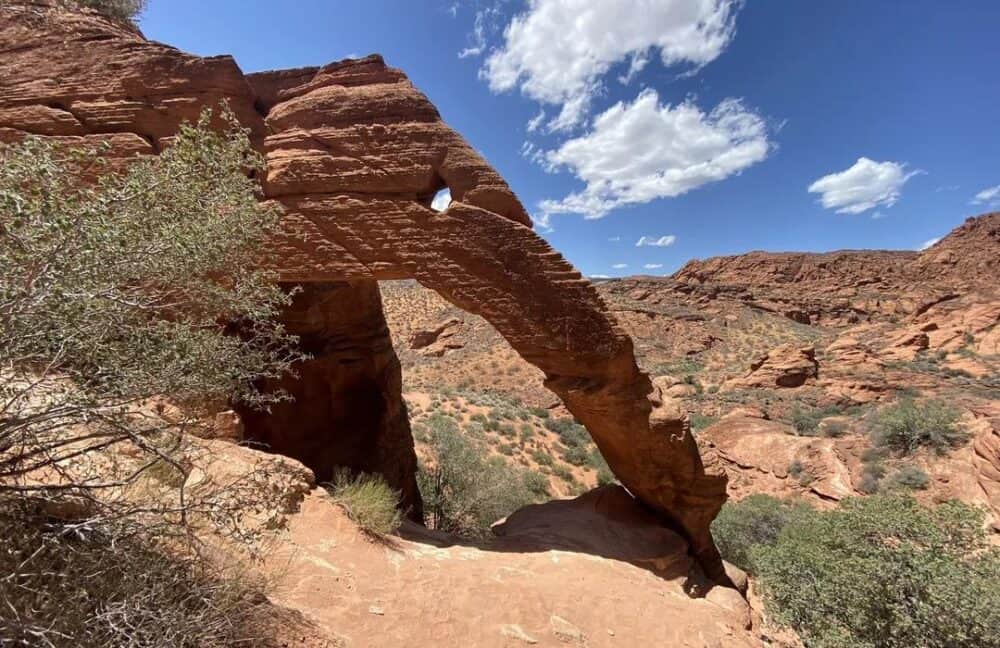
Strenuous: Angel’s Landing via West Rim Trail
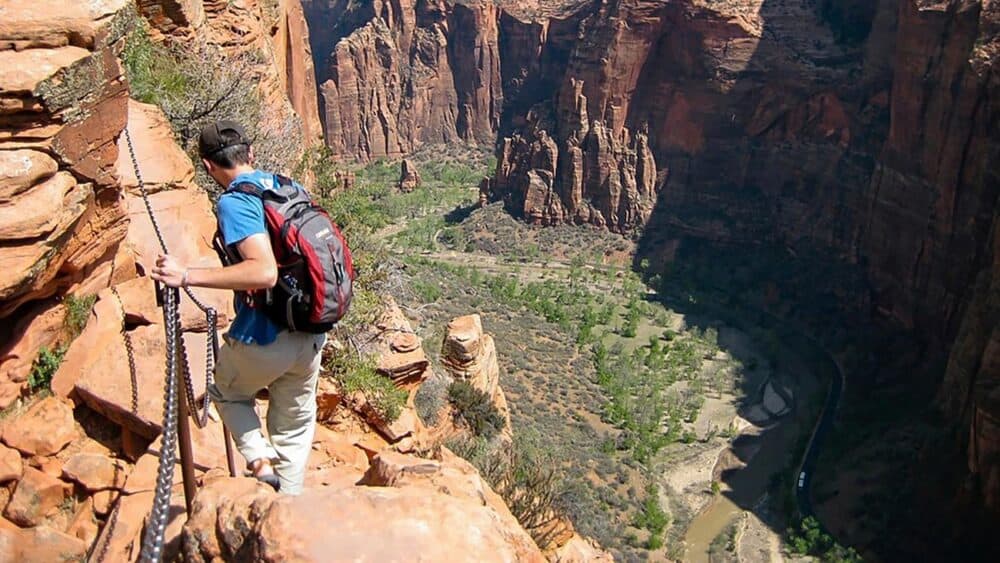
- Length: 5.4 miles round trip
- Difficulty: Strenuous (steep 1,488 ft elevation gain; final section is a very narrow ridge with chains to hold – not for anyone with fear of heights or balance issues)
- Best Seasons: Spring and fall for moderate temperatures. Summer is extremely hot and very crowded (start at sunrise to beat heat and crowds, and watch for afternoon thunderstorms). Winter can have ice/snow on the trail, making the chain section dangerous.
- What to Bring: Permit (required – see below), at least 2 liters of water per person (no water on trail), snacks, sun protection. Wear boots or shoes with good traction. Do not attempt if storms or high winds are in the forecast.
- Notable Features: One of the best hikes in Southern Utah for thrill-seekers. The trail climbs Walters Wiggles (21 tight switchbacks) to Scout Lookout, then continues along a narrow sandstone fin to Angel’s Landing. The views of Zion Canyon from the top are absolutely breathtaking and earned by your hard work. This iconic hike is both spectacular and nerve-wracking – there are long drop-offs for the last half-mile. Angel’s Landing has become so popular that the park now limits access.
- Permits/Fee: Permit required (A lottery system limits hikers due to safety concerns). Apply in advance on the Zion NP website. If you win a permit, there is a fee per person. Zion entrance fee or pass also required. Rangers strictly enforce permits at Scout Lookout – do not attempt to continue without one. (Tip: If you don’t get a permit or don’t want the exposure, hike to Scout Lookout or the West Rim Trail for great views without the final scary part.)
Other Zion Hikes to Consider: If you have time, The Narrows (Bottom-Up) is another Zion classic. It involves hiking in the Virgin River through a deep slot canyon. You can go as far as Big Spring (about 9.4 miles round-trip) without a permit, turning around whenever you’ve had enough. It’s moderately strenuous (walking in water on slippery rocks) and best done in summer or early fall when water levels are lower (but always check flash flood risk!). Gear like water shoes, neoprene socks, and a walking stick are highly recommended for The Narrows.
Also, Emerald Pools Trails (easy to moderate) offer pretty waterfalls and pools – Lower Emerald Pool is an easy 1.2-mile round trip, while Upper Emerald Pool via Kayenta Trail is a moderate 3-mile loop. These are great family-friendly hikes but can be crowded. Zion has many options, so pick what matches your comfort level.
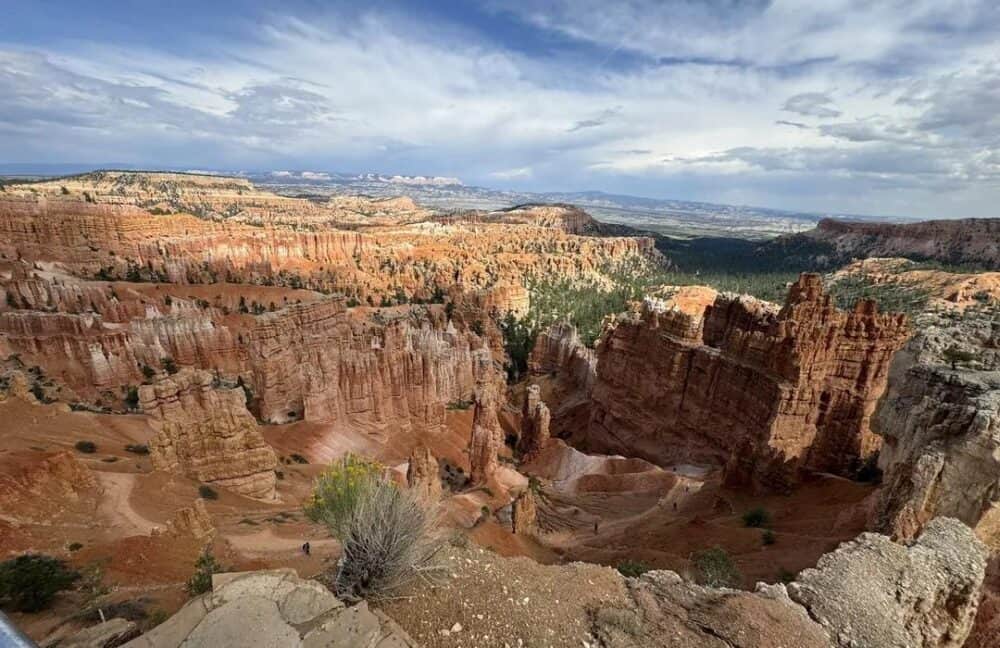
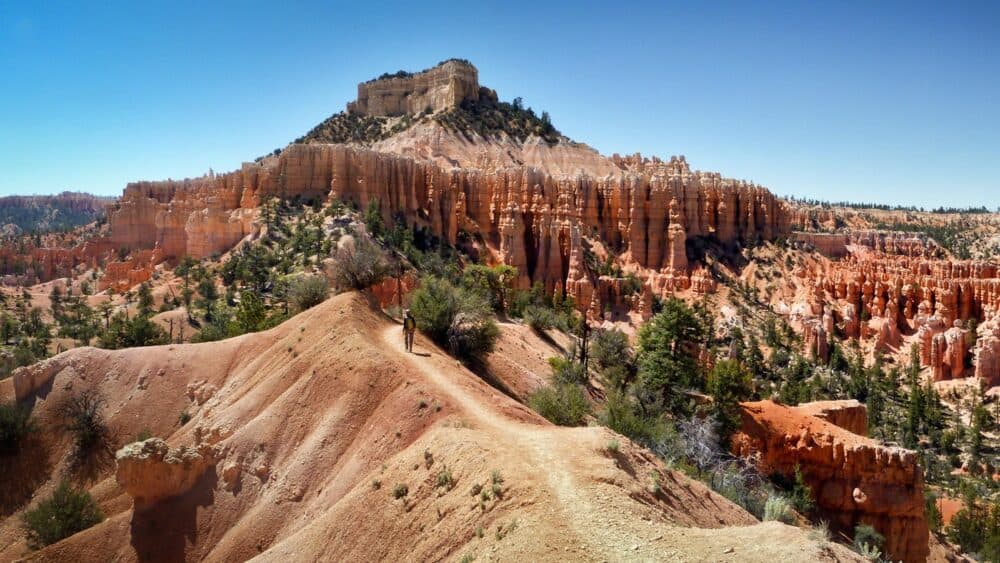
Bryce Canyon National Park (South-Central Utah)
Bryce Canyon National Park is known for its otherworldly hoodoos – spire-shaped rock formations that fill its colorful amphitheaters. At elevations around 8,000–9,000 feet, Bryce is cooler than the low desert, and you’ll feel the altitude on uphill hikes.
Best seasons: Summer is prime (pleasant temperatures, but expect crowds). Spring and fall are cooler and beautiful; some trails or roads may have snow in early spring or late fall. Winter is cold with snow, but the park’s trails remain open (you might even snowshoe among the hoodoos!).
What to bring: Layers (it can be chilly even in summer mornings due to altitude), sun protection, and plenty of water (high altitude can dehydrate you quickly). Park entry fee required. Here are some top Southern Utah Hikes in this region by difficulty:
Easy: Mossy Cave Trail

- Length: 0.8 miles round trip
- Difficulty: Easy (short walk with slight uphill)
- Best Seasons: Spring through fall. In winter, the “mossy cave” fills with icicles – a unique sight if you don’t mind cold.
- What to Bring: Sneakers or any comfortable shoes, water (even short hikes need hydration), and a camera – there’s a small waterfall that’s very photogenic.
- Notable Features: This short trail leads to a mossy grotto (cave-like alcove) and a pretty little waterfall along a stream. In summer, dripping moss and ferns make the cave area cool and green; in winter, spectacular icicles form. It’s an off-the-beaten-path spot on the park’s north end, great for families. Because it’s easily accessible by car, it can get busy mid-day – go early or late for more solitude.
- Permits/Fee: No special permit required. Just your park entry fee. Parking is limited; do not park along the road (you could be ticketed or towed).
Moderate: Queen’s Garden & Navajo Loop Combination
- Length: 2.9 miles round trip (loop)
- Difficulty: Moderate (trail is well-marked but involves a 600+ ft descent and ascent out of the canyon)
- Best Seasons: Late spring through fall. Summer is great but start early to avoid afternoon thunderstorms and heat. In winter, portions may be closed (and the loop isn’t fully connected due to ice) – check conditions.
- What to Bring: Good hiking shoes (the trail is dirt and rock, can be slippery when wet), water (at least 1–2 liters; there’s no water on the trail), a hat, and snacks. A hiking pole can help on the steep sections.
- Notable Features: This is Bryce’s most popular trail loop for good reason. You’ll walk down into the Bryce Amphitheater among the orange hoodoos. Highlights include Queen’s Garden (where a hoodoo looks like Queen Victoria – there’s a sign), and Wall Street or Two Bridges on the Navajo Loop (tall sandstone walls and narrow switchbacks). We recommend hiking clockwise: start at Sunrise Point going down Queen’s Garden (the “least difficult” way down into the canyon), then connect to Navajo Loop and come up to Sunset Point. The climb up Navajo has two options – Wall Street side (a slot-like switchback section) is closed in winter for safety; Two Bridges side is the alternate. Either way, the last stretch is a bit steep, so take your time and enjoy the incredible views looking up at Thor’s Hammer and other formations. Despite the workout, this trail is achievable for most hikers who take it slow – even kids love winding through the maze of hoodoos. It’s often cited as one of the best hikes in Southern Utah for families.
- Permits/Fee: No permit needed. Just pay the Bryce Canyon entry fee or show your parks pass. The trailheads at Sunrise and Sunset Points are along the main road (shuttle service is available in peak season if parking is full).
Strenuous: Fairyland Loop Trail
- Length: ~8.0 miles round trip (loop)
- Difficulty: Strenuous (about 1,600–1,900 feet total elevation change)
- Best Seasons: Spring, summer, or fall. This long hike is best done when days are longer (summer) but not too hot. Start early in the morning to avoid thunderstorms and to give yourself plenty of time.
- What to Bring: At least 2 liters of water per person (there is no water along the trail), high-energy snacks/lunch, sun protection (parts of the trail have little shade), and broken-in hiking boots. A map or trail description is handy – the trail is marked, but it’s a less-trodden loop so be mindful of signs.
- Notable Features: Fairyland Loop lives up to its name – it feels like walking in a fairy-tale landscape of pastel spires and fins. It is quieter and less crowded than the main amphitheater trails. You’ll see famous formations like the China Wall and Tower Bridge, and you’ll get continuous views of bizarre and beautiful hoodoos. Because it’s a longer loop, you get more solitude. The trail undulates quite a bit (lots of up and down), so it’s a good workout. Keep an eye out for pronghorn (a deer-like animal) which sometimes graze in the area. This loop is often listed among Utah’s great hikes for experienced hikers due to its length and scenery.
- Permits/Fee: No permit required. Park entry fee applies. You can start the loop at Fairyland Point (just past the park entrance station) or near Sunrise Point. If starting at Fairyland Point and the small lot is full, you can park at the Bryce Canyon Visitor Center and walk a short connecting trail.
(Tip: If an 8-mile hike is too much, you can do an out-and-back on part of Fairyland to experience the scenery without the full loop. Or try the shorter Peekaboo Loop (5.5 miles) for another strenuous option inside the main amphitheater.)
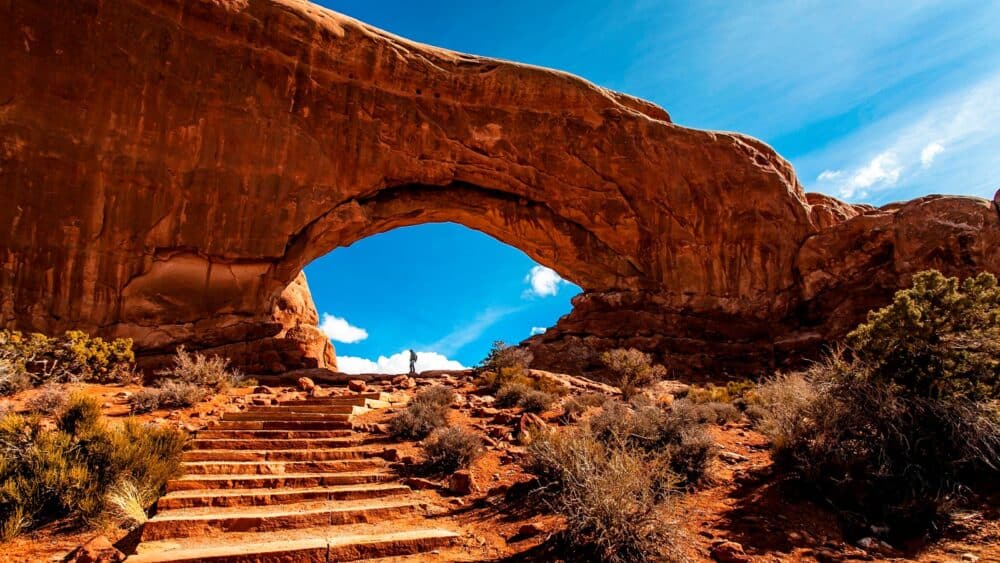
Arches National Park (Moab Area, Southeast Utah)
Arches National Park is world-famous for its natural stone arches – over 2,000 of them! This red rock wonderland near Moab, Utah offers trails that let you walk right up to these geologic marvels. Many Arches trails are relatively short, but be aware: there is very little shade and summer temperatures soar.
Best seasons: Spring and fall are ideal; summer is extremely hot (carry extra water and avoid mid-day hiking if possible). Winter is cold but quiet (some trails may have ice on slickrock).
What to bring: Water, water, water – we can’t stress that enough (at least 1 liter per hour of hiking in heat). Sunscreen, hat, and sturdy shoes are must-haves. Some trails are on slickrock (smooth sandstone) which can be slippery when wet or icy, so check conditions. Arches requires an entry fee, and timed entry reservations may be needed during peak season (April–October) – check the NPS website for current rules. Here are highlights of easy, moderate, and strenuous Southern Utah hikes in Arches:
Easy: Windows Loop and Double Arch
- Length: ~1.2 miles round trip (Windows Loop plus short spur to Double Arch)
- Difficulty: Easy (mostly flat with a few steps; suitable for almost everyone)
- Best Seasons: Year-round. In summer, do this in early morning or late afternoon for cooler temps and great light on the arches.
- What to Bring: Light hiking shoes or sneakers are fine. Bring water (it’s short, but the sun is intense). A wide-brimmed hat and sunglasses will help with the bright glare on the sand and rock.
- Notable Features: This area is like an outdoor playground of arches. From the parking lot, a well-marked trail leads to the North and South Window Arches and Turret Arch. You can make a small loop around these formations. The Windows are giant eye-shaped openings in a sandstone fin – very photogenic, especially with morning light glowing through. After touring the Windows, don’t miss Double Arch (visible from the parking area on the opposite side). A 0.5-mile round trip gravel path takes you to the base of Double Arch, which is an enormous twin arch you can walk beneath. Kids and adults alike love scrambling on the rocks under Double Arch (be careful, of course). These trails give a lot of “wow” for little effort, making them great family-friendly hikes.
- Permits/Fee: No permit needed. Just the park entry fee (and in peak season 2023 and beyond, Arches has required a timed entry ticket during the daytime – plan ahead to reserve a time slot online, or visit before 7am or after 5pm when reservations may not be required). Parking can fill up; if so, wait for a spot or visit earlier/later in the day.
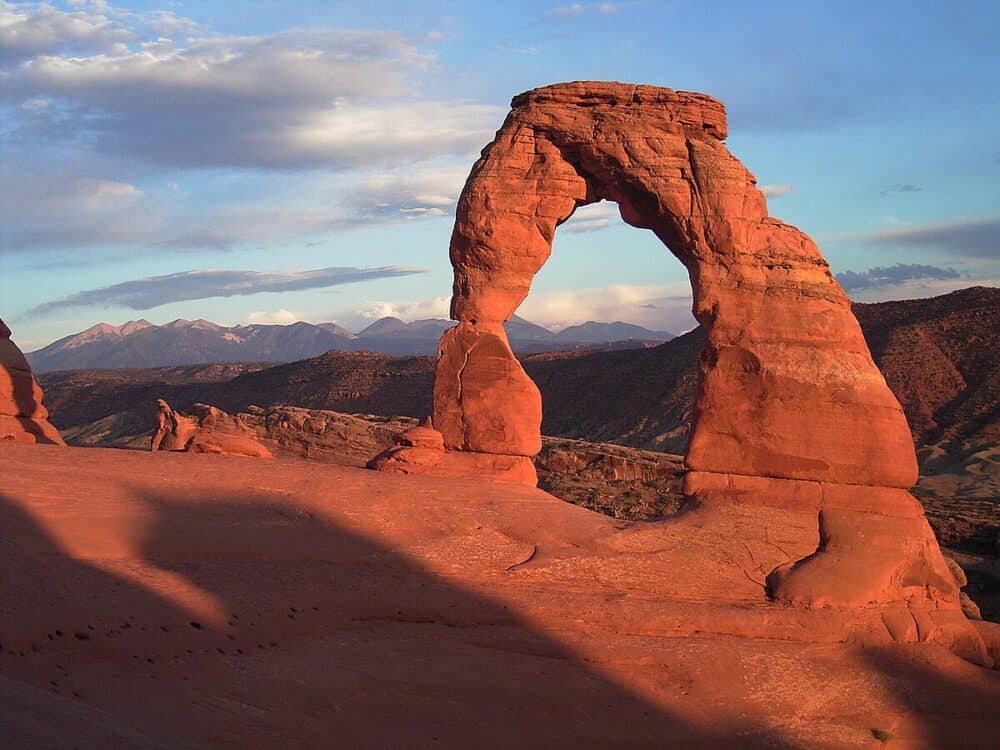
Moderate: Delicate Arch Trail
- Length: 3 miles round trip
- Difficulty: Moderate (the trail climbs ~480 feet in elevation over 1.5 miles, including a long stretch up an open rock slab with no shade)
- Best Seasons: Late fall, winter, and spring are best for avoiding extreme heat. Summer requires early morning or sunset hiking due to high temperatures (and to catch the famous sunset glow on the arch). If visiting in winter, be mindful of ice on the slickrock.
- What to Bring: At least 1–2 liters of water per person, even in cool weather. Sturdy footwear – you’ll be walking on sandstone. Sun protection (there’s literally no shade for most of the hike). A camera is a must for the iconic arch. In cooler months, pack a jacket; wind can be brisk at the arch.
- Notable Features: Delicate Arch is Utah’s most famous arch – the one on the license plates – and the hike to it is a pilgrimage for many. The trail starts near the historic Wolfe Ranch and Ute petroglyphs (stop to read the signs and see the rock art). Then it climbs steadily, including a memorable section where you hike up a huge slickrock slope. Follow the rock cairns (piles of stones) to stay on track. The last part of the trail runs along a cliff edge (a few feet wide, with some drop-off) for about 200 yards – hold kids’ hands here. Then, suddenly, you round a rock corner and there it is: Delicate Arch standing alone on the rim of a sandstone bowl. It’s an awe-inspiring sight, especially as the sky changes color in late day. Many hikers sit and spend time at the arch, soaking in the view of the La Sal Mountains beyond. Keep an eye on children and avoid getting too close to the edge of the bowl. Rangers often remind people to consider their fitness – this trail, though only 3 miles, has fooled some into underestimating it (it’s uphill and hot; rescues happen for those who don’t bring water). But with proper preparation, it’s absolutely worth it.
- Permits/Fee: No permit required. Park entry fee (and possibly timed entry reservation in high season) required. Parking at the Delicate Arch trailhead (Wolfe Ranch) can overflow – another reason to go early or late. Pro tip: If you can’t hike this but want to see Delicate Arch, there are lower viewpoint trails (100 yards and 0.5 mi) that show it from a distance, but nothing beats standing at its base!
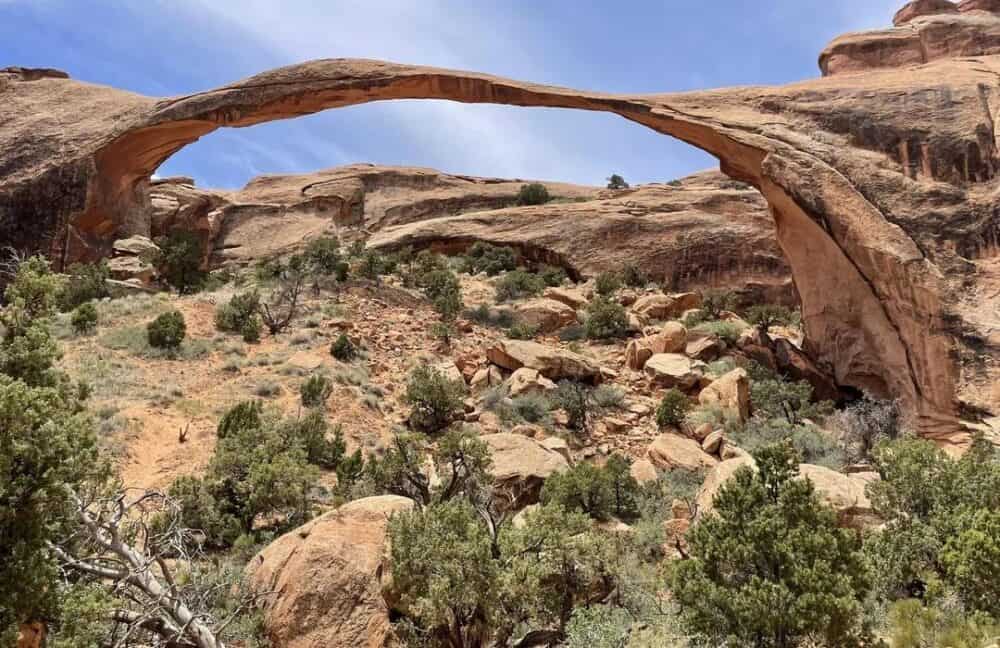
Strenuous: Devil’s Garden Primitive Loop (Landscape Arch & More)
- Length: Up to 7.2 miles round trip if you do the full loop with all spur trails
- Difficulty: Strenuous (if doing entire loop: involves rock scrambling, route finding, and some exposure on narrow fins). The first section to Landscape Arch is easy, but beyond that the trail is difficult.
- Best Seasons: Spring and fall. In summer, start at sunrise to avoid heat – this trail has long stretches on bare rock. Winter can be tricky or dangerous if snow/ice on rock surfaces.
- What to Bring: Ample water – 2 to 3 liters per person for the full loop (the dry desert air and physical effort will make you thirsty). Snacks or lunch. Sun protection (there is minimal shade). Sturdy hiking boots with good grip. A map is recommended; though the route is marked by cairns, it’s easy to get turned around on rock surfaces. If you have a fear of heights, you might choose to turn around at certain points.
- Notable Features: This is Arches National Park’s longest and most adventurous hike. It’s like a greatest-hits tour of arches: on one journey you can see Landscape Arch (the longest span in the park, a super thin delicate arch – get your photo at the viewpoint), Partition Arch, Navajo Arch, Double O Arch, and others, plus the spire called Dark Angel if you take that spur. The trail begins at the Devil’s Garden trailhead at road’s end. The first 0.8 mile to Landscape Arch is flat and easy – families with young kids often go that far (just keep them from running, as a large slab fell from Landscape Arch in 1991!). After that, the trail climbs up and over sandstone fins. You’ll use hands and feet to scramble at times. There are a few spots with steep drop-offs on the fins, so move carefully. The Primitive Trail section on the return (if you make a loop) involves route-finding through sandy washes and slickrock, and even a section where you descend into a canyon with a small ladder or step-down. It’s a fun challenge for experienced hikers – allow plenty of time (3–4 hours or more). Many people choose to hike to Double O Arch (about 4 miles round trip) and then return the same way, skipping the most difficult Primitive Loop part. That’s a good option if you want to avoid the hardest segments but still see most arches. No matter how far you go, Devil’s Garden showcases the wild beauty of Arches NP beyond the roadside viewpoints.
- Permits/Fee: No permit needed for day hiking. (If you wanted to do backpacking here overnight, you’d need a permit – but most do this as a day hike.) Entry fee or park pass required. Note: The Fiery Furnace area in Arches is another strenuous adventure (requires a permit or guided tour) but that’s a separate special hike not on this trail; mention it if you have an extra day and want a unique off-trail maze experience (with permit).
Other Arches Highlights: If you prefer a shorter challenging hike, try Park Avenue (2 miles round trip through a tall-walled canyon) or Tower Arch in the remote Klondike Bluffs area (3.4 miles round trip, moderate). And just outside Arches in the Moab area, consider Corona Arch (3 miles round trip, moderately challenging) – not in the national park, but a spectacular arch hike on BLM land with no reservation required. The Moab region is full of fantastic trails beyond the national parks, so you can extend your adventure if time allows.
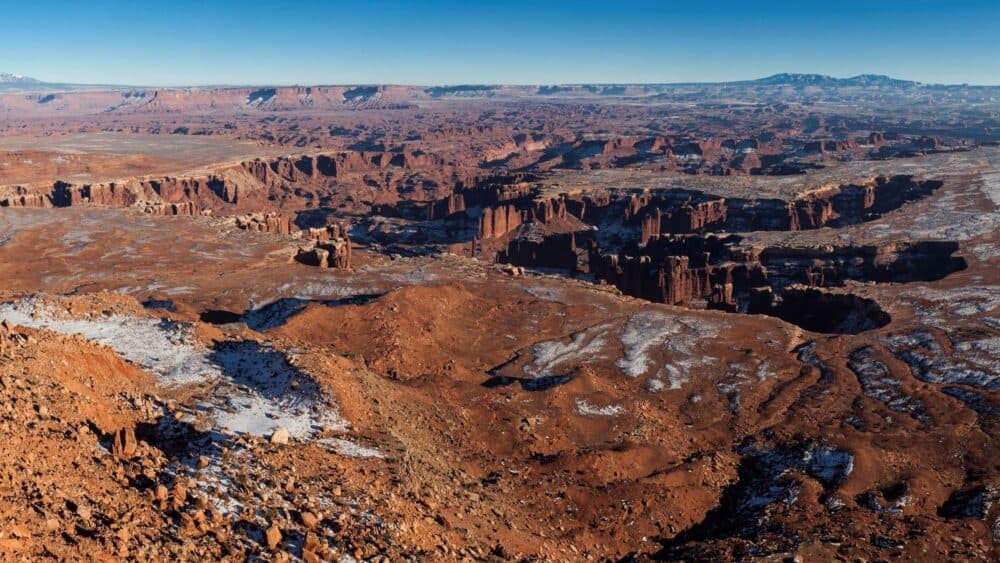
Canyonlands National Park (Island in the Sky & Needles Districts)
Canyonlands National Park is vast, split into districts separated by rivers. The two most accessible districts for hiking are Island in the Sky (near Moab, a high mesa with grand overlooks) and The Needles (further south, a backcountry area known for its striped rock pinnacles). Canyonlands offers a more rugged experience than some parks – you can find real solitude here.
Best seasons: Spring and fall are best. Island in the Sky can be very hot in summer on exposed trails (but shorter hikes are still doable in mornings/evenings). Needles is at lower elevation, so summers are extremely hot; late fall or early spring are ideal for long Needles hikes. Winters are cold but often hikable (chance of snow on mesa).
What to bring: Always carry plenty of water (no water sources on trails unless you’re by the river, and even then you must filter). Navigation tools (map/compass or GPS) are smart for Needles longer trails – signage exists but in the backcountry you should be prepared. Sun protection and sturdy boots are a must. Canyonlands has an entry fee; no shuttles, you drive to trailheads.
Let’s highlight one easy, one moderate, and one strenuous trail in Canyonlands:
Easy: Mesa Arch (Island in the Sky)
- Length: 0.5 mile loop (0.7 miles round trip according to some guides)
- Difficulty: Easy (short and relatively flat, with a small incline; some rocky steps)
- Best Seasons: Year-round. Sunrise is the superstar time to visit (photographers flock here to catch the sunburst under the arch). But it’s beautiful any time of day. In winter, watch for a bit of ice on the trail, but the park often keeps it accessible.
- What to Bring: Just a bottle of water and maybe your phone/camera. A tripod if you’re doing serious photos at sunrise. No need for special gear on this one, but do wear decent shoes since the path is rocky (sandals might be fine but closed-toe shoes are safer).
- Notable Features: Mesa Arch is a spectacular arch right on the edge of a cliff, framing the view of deep canyons and distant mountains. It’s one of the most famous sunrise spots in Utah – at dawn, the bottom of the arch glows a brilliant orange from the sun’s rays. The hike itself is a quick loop through juniper and sagebrush. When you arrive at the arch, be careful near the edge; there’s a huge drop on the far side! This trail is perfect for all ages (kids love peeking through the arch). Because it’s so short, consider combining it with other Island in the Sky stops (like nearby overlooks). Early morning is busy with photographers, but if you come mid-day you might have it mostly to yourself. It’s an iconic view with minimal effort, a great introduction to Canyonlands.
- Permits/Fee: No permit needed. Entrance fee for Canyonlands required. Parking is along the Mesa Arch trailhead on the main Island in the Sky road; it can overflow during peak times (sunrise, etc.), so plan accordingly.
Moderate: Grand View Point Trail (Island in the Sky)
- Length: 2 miles round trip
- Difficulty: Easy-Moderate (mostly flat with a bit of rock scrambling at the end; elevation gain is minimal, but the trail has some uneven slickrock)
- Best Seasons: Spring, fall, or cool mornings in summer. This trail follows the rim of the mesa, so it’s very exposed to sun and wind. On a clear winter day, it’s also lovely (just bundle up).
- What to Bring: Water and a hat – even though 2 miles isn’t far, the sun can be intense on the open rock. Wear good shoes as parts of the trail cross rock slabs. Keep kids close near the rim.
- Notable Features: As its name suggests, this trail offers a grand view – actually multiple grand views – of the Canyonlands terrain. You walk along the edge of Island in the Sky mesa, with jaw-dropping vistas of the canyons carved by the Green and Colorado Rivers on both sides. At the end of the trail, there’s a viewpoint where you can see for dozens of miles on a clear day, spotting features like Junction Butte and the confluence of the rivers (though the rivers are far below, hidden in deep canyons). Along the way, you’ll peer down sheer cliffs and see the white-rimmed sandstone bench that gives White Rim Road its name (that’s a famous 4×4 road below). The hike itself is straightforward – follow the rock cairns and trail along the rim. It’s an out-and-back, so you’ll return the way you came, enjoying the views in reverse. This is a great trail if you want maximum scenery for moderate effort. It’s often recommended for families as one of the family-friendly hikes in Canyonlands (just use caution at cliff edges).
- Permits/Fee: No permit required for day hiking. Just the park entry fee. Trail starts at the Grand View Point parking area at road’s end in Island in the Sky.
(Alternate Moderate in Island in the Sky: If you want a bit more challenge and some interesting archaeology, Aztec Butte Trail (2 miles round trip) involves a short steep climb onto a butte and leads to ancestral Puebloan granary structures. Another option: Upheaval Dome Overlook (1 mile round trip to first overlook, 1.8 to second) – moderate climb to see a mysterious crater.)
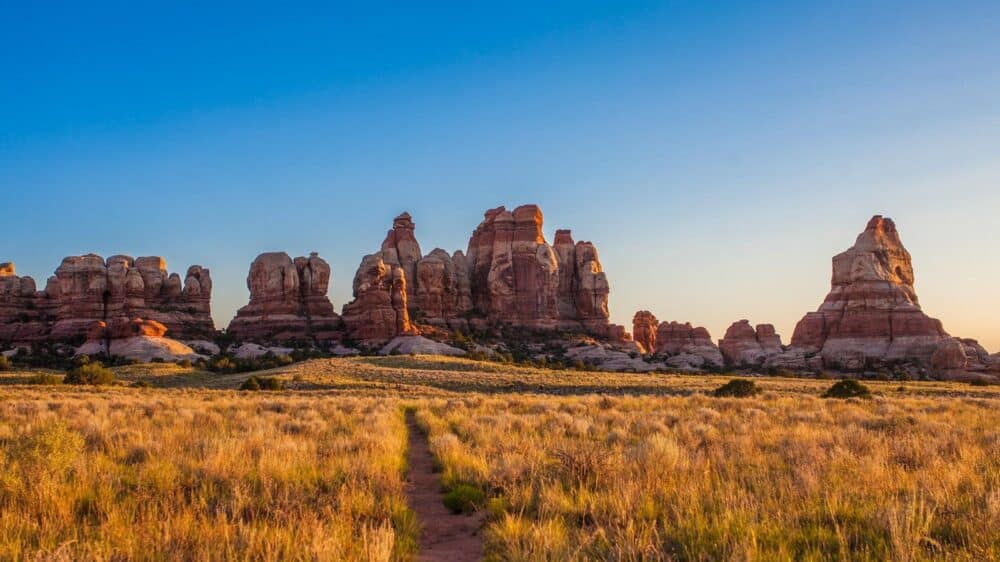
Strenuous: Chesler Park Loop (Needles District)
- Length: ~11 miles round trip (loop)
- Difficulty: Strenuous (long distance with about ~600–700 ft total elevation gain, plus rock scrambling and route-finding in places)
- Best Seasons: Spring and fall are prime. This hike is in the Needles backcountry, which is hot and exposed in summer – not recommended in July/August afternoons. In spring, the desert wildflowers and pleasant temperatures are wonderful. Fall offers cooler weather too. Plan for a full day hike.
- What to Bring: A lot of water – at least 3 to 4 liters per person for the loop, since you’ll be out most of the day with no water sources. High-energy food/lunch. Sun protection (hat, sunscreen, sunglasses) – shade is scarce. A good trail map or GPS: The trail is marked by cairns and signs, but multiple trail junctions (and spur trails) exist. Sturdy boots are needed; you’ll be traversing slickrock and sandy washes. A first-aid kit is always smart on remote hikes.
- Notable Features: If you’re craving an immersive backcountry experience, Chesler Park Loop delivers. The Needles District is named for its red-and-white banded rock spires, and this trail winds through the heart of those Needles formations. The loop starts at the Elephant Hill trailhead (which requires driving a rough road – high clearance recommended). You’ll hike over slickrock domes, through narrow defiles, and emerge into Chesler Park, a broad grassy basin surrounded by towering rock pinnacles. The scenery feels almost like a hidden world. Many hikers consider the scenery in Chesler Park the most beautiful in Canyonlands. Midway, the trail goes through the Joint Trail, a segment where you walk through deep, cool slot crevices in the rock – a fun break from the sun. Expect the loop to take 5–7 hours depending on your pace. It’s remote and you may not see many other people (carry the 10 essentials because help is far). The trail isn’t overly steep, but the length and some rock scrambling sections bump it to strenuous. If 11 miles is too much, you can do a shorter out-and-back to Chesler Park viewpoint (~6 miles round trip) and still see the needles up close. But if you can handle the full loop, it’s often cited as a highlight of Utah hiking for its solitude and unique landscape. Note: Summers, it will feel very long and hot – start at dawn in hot months.
- Permits/Fee: No day-hike permit required. However, you must obtain a day-use permit for the Elephant Hill 4×4 road if you’re driving beyond the trailhead (not needed just to park at trailhead). Check at the Needles visitor center. Park entrance fee required. If you plan to camp overnight in the Needles backcountry (at Chesler Park or elsewhere), a backcountry permit is required. For a day trip, just sign the trail register and enjoy. Do remember this trailhead is in a remote area of the park: it’s about a 3-hour drive from Moab and the last several miles are rough dirt (closed when muddy). Be sure to have a full tank of gas, and never enter slot sections like Joint Trail if rain is forecast (flash flood danger).
Capitol Reef National Park (South-Central Utah)
Capitol Reef is a hidden gem that many Utah road-trippers gloss over – but it has fantastic hiking for those who stop. Known for the Waterpocket Fold (a 100-mile wrinkle in the earth’s crust) and orchards in the historic Fruita district, Capitol Reef offers diverse trails: from shady canyon walks to panoramic summit views.
Best seasons: Spring and fall are best. Summers can be very hot (though monsoons can bring afternoon storms). Capitol Reef sits at 5,000+ feet elevation, so spring and fall days are pleasant and nights are cool. In winter, expect snow or mud on trails but smaller crowds.
What to bring: Water and sturdy shoes are important – some trails have rocky sections or sandy washes. A hat and sunscreen, especially for exposed trails like rim overlooks. Capitol Reef has a mix of easy and hard hikes; always check at the visitor center for any trail closure or flash flood warnings, especially for narrow canyons. No shuttle here – you drive to trailheads. There’s no entrance gate on the scenic drive (it’s honor system fee in some areas), but some parts of the park require a fee for the scenic dirt roads.
Here are a few great Southern Utah hikes in Capitol Reef by difficulty:
Easy: Capitol Gorge Trail
- Length: 2 miles round trip (1.0 mi each way)
- Difficulty: Easy (flat walk through a canyon bottom)
- Best Seasons: Spring and fall. Summer mornings are fine, but afternoons can be very hot in this canyon (and there’s not a ton of shade until late day). Avoid if heavy rain is forecast, as this is a flash-flood prone gorge.
- What to Bring: Sneakers or hiking shoes (you will be walking on gravel/sand and some rocks). Water and a hat – the high canyon walls give some morning/late afternoon shade, but midday sun hits parts of the trail. Perhaps a flashlight if you want to explore small alcoves (not necessary, but kids might enjoy).
- Notable Features: This trail is at the end of Capitol Reef’s Scenic Drive (you drive a short dirt road into Capitol Gorge to reach the trailhead). It’s like walking in between skyscrapers of stone – towering cliffs rise on both sides of you as you follow the sandy wash. A highlight about 0.75 miles in is the Pioneer Register, where early settlers and pioneers in the 1800s carved their names high on the canyon wall (look up to spot the old dates and names – it’s history etched in stone). Near that area you’ll also see some ancient petroglyphs if you look carefully. Another 0.1-0.2 mile past the register, there’s a side trail that climbs a short way to the “Tanks” – waterpocket pools in the rock. It’s a bit of a scramble up to see these natural potholes that sometimes hold rainwater. Many families skip the Tanks if it’s hot, but they’re fun to check out if you have the energy (just use caution on the slickrock). Capitol Gorge is a nice, accessible hike for all ages – it was literally the old road through the Fold before modern highways, so you’re strolling through a piece of history.
- Permits/Fee: No permit needed. The Scenic Drive in Capitol Reef does require paying a fee (if you don’t have a national parks pass, you can pay at a self-pay station or visitor center). If the dirt road to the trailhead is closed due to flooding, you may have to park earlier and add distance. Normally, you can drive right to the trail start.
Moderate: Hickman Bridge Trail
- Length: 1.8 miles round trip (0.9 mi each way)
- Difficulty: Moderate (some short steep sections and about 400 feet of elevation gain)
- Best Seasons: Spring and fall are ideal. This trail can be hot in summer midday because it’s exposed on the slopes – but it’s short, so an early start or late afternoon hike works. In winter, it’s usually accessible; just check if there’s snow/ice after storms.
- What to Bring: Closed-toe shoes with good grip (you’ll be on dirt and rock; there are also some rocky steps built into the trail). Bring water – even though under 2 miles, the dry air and altitude can sneak up on you. Sunscreen and hat are recommended; much of the trail is in direct sun except near the bridge.
- Notable Features: Hickman Bridge is a massive natural bridge (similar to an arch, but formed by water erosion) spanning 133 feet. The trail is a local favorite because it’s not too long yet provides fantastic views of Capitol Reef’s cliffs, plus the impressive stone bridge at the end. You start by the Fremont River and ascend through a sandstone canyon. Early on, there’s a neat Navajo sandstone switchback section where you get panoramic views down toward Fruita and the Capitol Dome (a white rock formation that inspired the park’s name “Capitol”). As you continue, look for a short signed spur to a petroglyph panel left by the Fremont people – it’s easy to miss, but adds cultural interest. The trail then loops under the huge Hickman Bridge. You can walk right underneath this 125-foot high formation and feel dwarfed by its size. On the far side, the trail actually loops around so you see the bridge from different angles before returning the way you came. It’s a great hike for families that want a bit of uphill challenge and a grand payoff. Kids often enjoy hiding in the shade under the bridge or testing echoes in the natural amphitheater-like area beneath it.
- Permits/Fee: No permit. No entrance fee required specifically for this trailhead (Capitol Reef’s main scenic area is not gated). The trailhead is 2 miles east of the Visitor Center on Hwy 24, a well-marked parking area. It can fill up in peak midday, but has decent turnover since the hike is short.
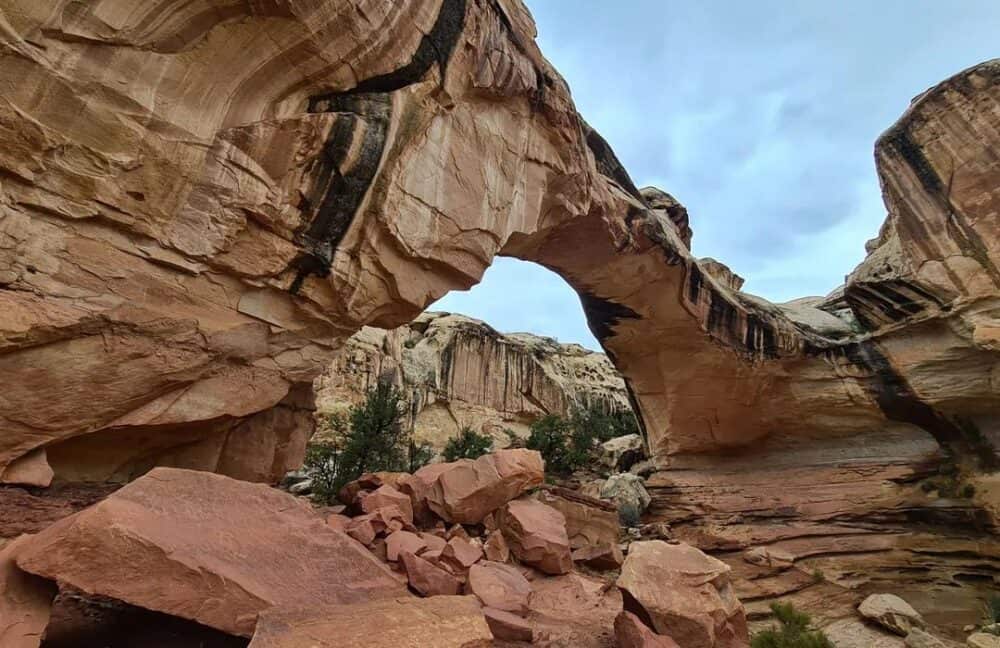
Strenuous: Cassidy Arch Trail
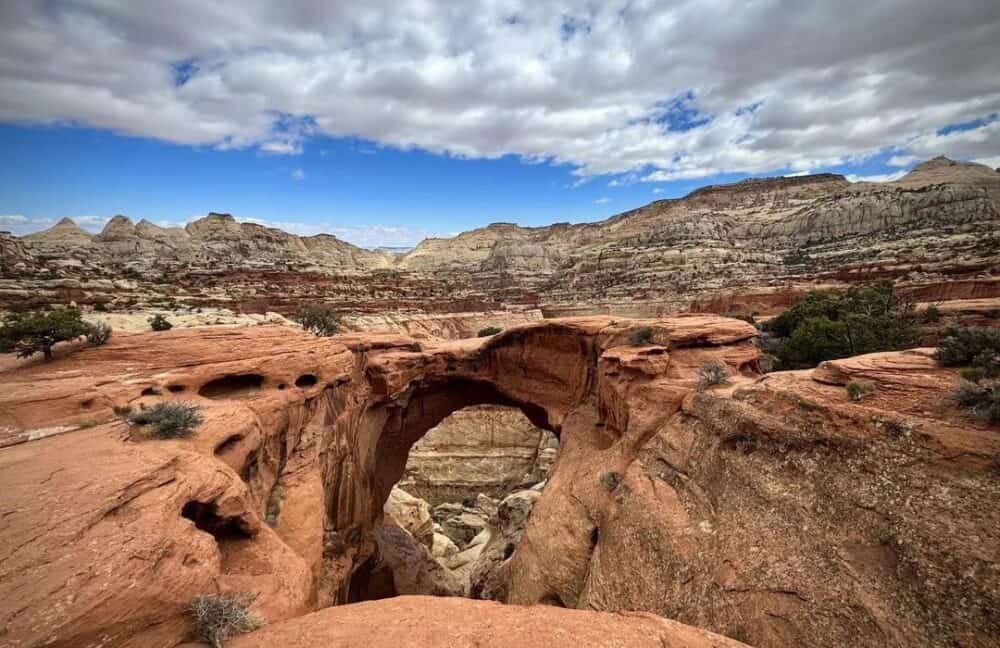
- Length: ~3.4 miles round trip (1.7 mi each way)
- Difficulty: Strenuous (steep climb of about 670 feet in 1.7 miles) The trail involves steep switchbacks and walking on slickrock ledges. Not recommended for young children or those with vertigo (you end up on a high cliff).
- Best Seasons: Spring and fall. Start early to beat the heat in summer, as the climb is exposed. In cooler months, midday is fine but remember the sun sets early behind cliffs, so allow enough time. Avoid if thunderstorms threaten – you wouldn’t want to be on high exposed rock in lightning.
- What to Bring: Good hiking boots (the slickrock and gravel can be slippery; boots give ankle support on uneven terrain). Plenty of water – you’ll be exerting yourself on the climb. Perhaps trekking poles if you like support on steep downhills (they help coming back down). A few snacks for energy at the top. Definitely a camera – Cassidy Arch is one of the park’s iconic sights.
- Notable Features: This trail leads you to Cassidy Arch, a large arch atop a cliff that you can actually walk on (with caution). It’s named after the outlaw Butch Cassidy, who, legend says, hid in these parts. The adventure starts at the Grand Wash trailhead – you walk a short way in Grand Wash and then the trail splits off and immediately starts climbing the cliffside via steep switchbacks. It’s a lung-buster for a bit, but turn around occasionally to see the Grand Wash canyon floor dropping below you. Once you gain the mesa, the trail traverses on slickrock ledges with beautiful views into the red and white layered canyon walls. Follow the cairns across the sandstone. Near the end, you’ll suddenly come upon Cassidy Arch, a thick arch spanning a chasm below. The unique part is you arrive at the top of it, so you see the abyss through the arch beneath your feet. There’s a flat area where many hikers safely sit or stand on the arch for a dramatic photo (be extremely careful – there are sheer drops on either side of the arch). Looking down, you might even spot canyoneers; Cassidy Arch is popular for rappelling (with permit) as it drops into a technical canyon. From the arch, the surrounding vista of the Waterpocket Fold is grand – multicolored cliffs in every direction. After marveling, you return the way you came. It’s a short but steep hike that offers a big thrill. Because of the elevation gain and heights, we label it strenuous – but strong hikers find it very rewarding.
- Permits/Fee: No permit for hiking. Capitol Reef collects a fee for vehicles on the Scenic Drive; however, the trail is accessed via Grand Wash road which splits off near the Scenic Drive (you’ll need to pay the entry fee to drive in that area). Check at the visitor center if any portion of Grand Wash is closed due to flash flood risk. Usually you can drive a fair bit into Grand Wash to park at the trailhead.
Other Capitol Reef Hikes: For another strenuous challenge, consider the Navajo Knobs Trail (9.4 miles round trip, 1,600 ft gain) which climbs to a panoramic summit with a 360° view – it’s the longest day hike in the park and truly epic for vista lovers. Or for a moderate, try Cohab Canyon (3.4 mi out-and-back or 1.7 one-way with shuttle, moderate, lovely hidden canyon near Fruita). And don’t forget to stop by the Fruita orchards in season to sample fruit, or grab a pie at the Gifford House – you earned it after those Southern Utah Hikes!
Grand Staircase–Escalante National Monument (South-Central/Southwest Utah)
Grand Staircase–Escalante (GSENM) is a vast BLM-managed area full of slot canyons, natural bridges, and wild desert landscapes between Bryce Canyon and Capitol Reef (and extending south towards the Arizona border). Because it’s not a national park, trails here are often unmarked routes and require more self-reliance – but the adventures are incredible.
Best seasons: Spring and fall. Many Escalante-area hikes are in low desert canyons – summers bring intense heat and the risk of flash floods during monsoon season (July-August). Late fall can be wonderful (colorful cottonwoods in the canyons), and even winter on a mild day is doable for some hikes.
What to bring: Navigation info (detailed trail descriptions or GPS coordinates) because signage is limited. Lots of water and snacks – you may be out longer than expected if exploring. Waterproof shoes or sandals for wading on certain hikes (some slots have water). A headlamp, whistle, and basic first aid – especially in remote canyons, these can be lifesavers. Check road conditions; many trailheads are down long dirt roads (which become impassable when wet). No entry fee for GSENM, but certain trailheads or day-use sites (like for Lower Calf Creek) might have a small fee.
Here are a few standout Southern Utah Hikes in the Escalante region:
Moderate: Lower Calf Creek Falls Trail
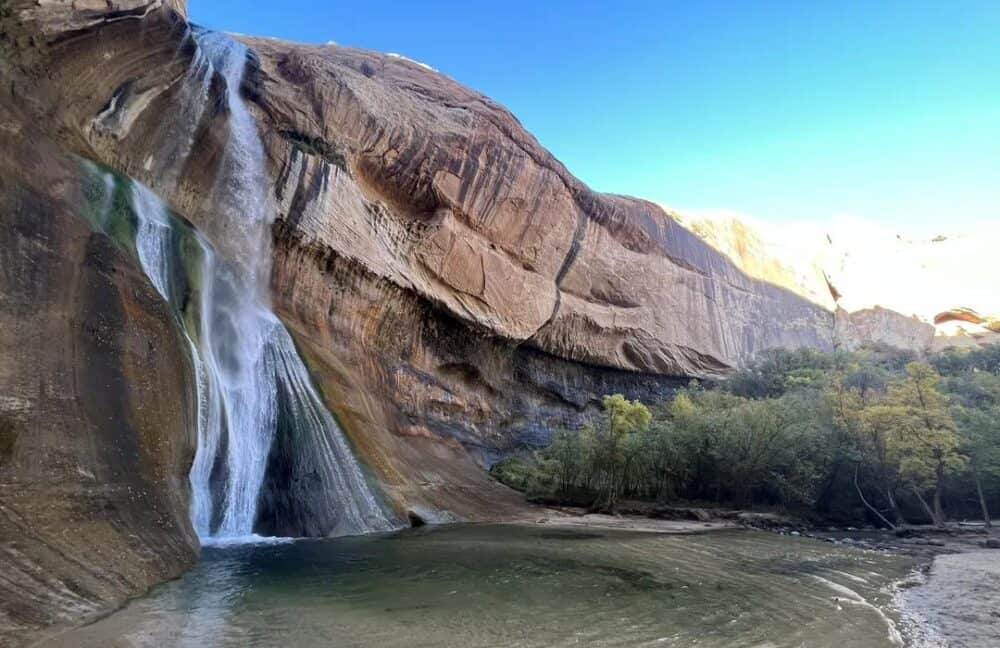
- Length: ~6 miles round trip (out-and-back)
- Difficulty: Moderate (distance is moderate, but trail is fairly flat with only ~500 ft gentle elevation change. The challenge is the length and some sandy sections which can make walking tiring).
- Best Seasons: Spring and fall are prime – March through June and Sept–Oct offer best weather. In summer, it’s still popular but you must start early or late to avoid midday heat (the reward is a cool waterfall pool at the end, though!). In winter, the trail is open and very peaceful; just dress warmly and expect icy water if you wade.
- What to Bring: At least 2 liters of water per person (the hike is ~3 hours total and the canyon, while it has shade and a creek, can still be hot). Good walking shoes (the trail is well-maintained but sandy in parts – your calves will feel it). Wear a swimsuit under your clothes or have quick-dry gear if you plan to take a dip at the falls (the water is cold year-round). Sunscreen and a hat – some stretches of the trail are under the sun, especially midday. There are no facilities on the trail, so use the restroom at the trailhead campground and pack out any trash.
- Notable Features: This is one of the most beloved hikes in the Escalante area – an oasis hike leading to a 126-foot waterfall. The trail follows Calf Creek through a beautiful canyon of Navajo sandstone. Along the way, if you picked up the brochure at the trailhead, you can spot interpretive markers: things like Fremont culture pictographs high on a canyon wall, beaver dams in the creek, and various desert plants. The sound of the creek and occasional shade from cottonwood trees make this trek pleasant even in heat (though parts are exposed). After about 3 miles, you reach Lower Calf Creek Falls: a stunning cascade pouring over a sandstone cliff into a clear pool. The area around the falls is lush and cool, with maidenhair ferns and moss thanks to the spray. Many hikers wade or swim in the pool – it’s chilly, but refreshing if you’re hot. Expect other people; this trail is popular and the waterfall area can feel like a little beach on weekends. Still, there’s plenty of room to spread out on the sand or rocks and have a picnic while enjoying the view. It’s common to hear delighted yelps as folks enter the cold water! Take care on slippery rocks near the falls, and remember to leave no trace. Once you’ve rested, head back the way you came, savoring the green creekside haven in the middle of the dry desert.
- Permits/Fee: No special permit required for the hike. However, the trailhead is in the Calf Creek Recreation Area (managed by BLM), which charges a small day-use fee (around $5) at the parking lot. The parking lot often fills by late morning on weekends, so consider coming early. There is a campground at the trailhead as well (first-come, first-served). Dogs are allowed on leash, but remember they’ll need plenty of water too (the creek water should be filtered if you let them drink from it due to potential algae advisories).
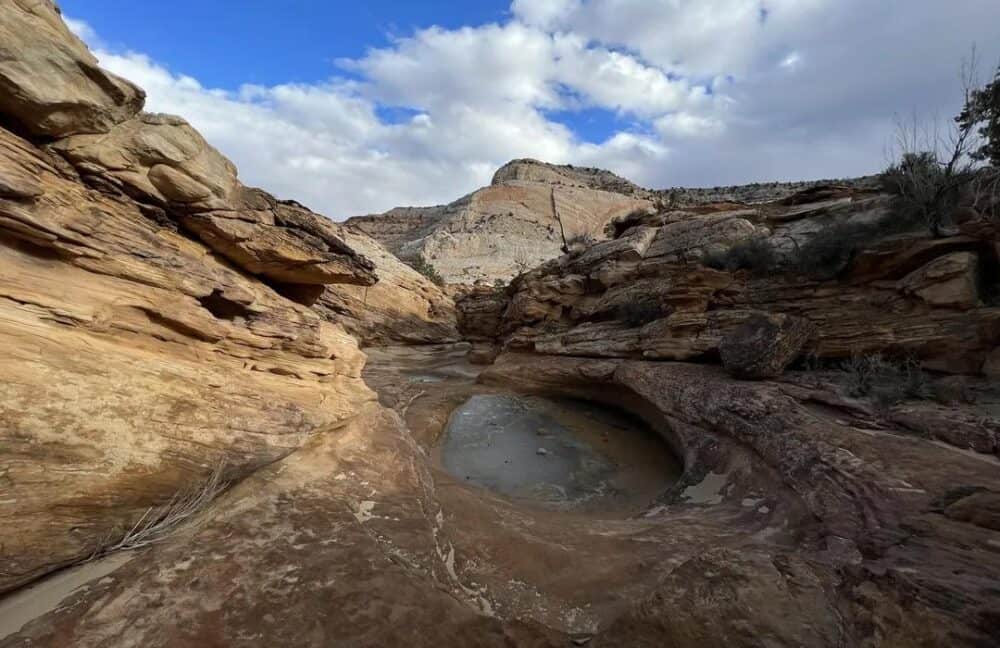
Moderate (Slot Canyon Adventure): Peek-a-Boo and Spooky Gulch Loop

- Length: ~3.5 miles round trip (loop combining two slot canyons)
- Difficulty: Moderate to Strenuous – this one is short in distance but requires agility. There’s some rock scrambling and squeezing through very narrow passages. Not great for anyone uncomfortable in tight spaces or not able to do a little climbing. However, no technical gear is needed; just hands, knees, and a sense of adventure.
- Best Seasons: Spring and fall. These slots are cool inside, which can be a perk on a hot day. Summer is okay if not stormy, but avoid in any rain forecast (flash flood danger in slot canyons is deadly serious). Winter can be extremely cold and possibly filled with ice water in the slots – not impossible, but only for the prepared (and slim, since bulky winter clothes might make the squeezes tougher!).
- What to Bring: No need for tons of water since it’s short, but do carry a bottle – climbing is exerting. Wear clothing that can get scuffed (you will be scraping against sandstone). Long pants or at least knee pads can help as you will crawl or duck-walk in sections. A dry bag or ziplock for your phone/camera, as there may be puddles and you’ll be contorting (protect your electronics). A headlamp isn’t required (there’s enough light in daytime), but it doesn’t hurt for the darkest parts of Spooky Gulch. If you have a larger body build or broad shoulders, be aware Spooky Gulch narrows to about 10-11 inches in spots– carrying a backpack through those narrows won’t work (plan to take it off and shimmy it separately, or go with a very small daypack). For kids: adventurous older kids usually love it (think natural playground), but very young kids or anyone who might panic in tight spaces should sit this out.
- Notable Features: Peek-a-Boo and Spooky are a pair of beautifully sculpted slot canyon hikes in the Dry Fork area of GSENM. They are often done as a loop: first Peek-a-Boo Gulch, then cross-country about half a mile, then down Spooky Gulch back to the wash. The fun starts even before the slots – you have to drive about 26 miles down Hole-in-the-Rock Road (dirt washboard) from Escalante, then 1.7 mi on a rough spur to Dry Fork trailhead. From the trailhead, you scramble down into Dry Fork wash and hike to the entrance of Peek-a-Boo Gulch. Peek-a-Boo starts with a 10-12 foot climb up into the slot, where there are some Moki steps (footholds) and usually someone has placed a rope to help. Once up that wall, you’re immediately in a magical winding passage. Peek-a-Boo has lovely corkscrew-shaped narrows and windows eroded in the rock – it’s like a red sandstone jungle gym. After about 0.3 miles, Peek-a-Boo opens up and you find the exit. Then you follow cairns over sandy, open desert (watch carefully, many people end up wandering – aim for the stand of juniper mentioned in directions and turn right toward Spooky). In a short while, you reach Spooky Gulch. Spooky is narrower and a bit more intense: at its skinniest, you must squeeze sideways (large adults sometimes have to exhale to fit). You’ll maneuver around chokestones (boulders wedged in the slot) and possibly drop into or climb out of a few 4-5 foot deep potholes. It’s truly an adventure – often completely dark in certain bends except for light above. The textures and twists of the canyon walls are incredible, but you might be focused on figuring out how to turn your body to get through! It generally takes 3-4 hours to do the loop. Everyone comes out smiling (and often a bit dusty). Just remember to only do this in good weather, and be courteous: in tight spots, communicate with any other hikers (you may need to backtrack to a wider spot to let others pass). Dogs are technically allowed but not recommended – the ladders and tight squeezes are not dog-friendly at all. Peek-a-Boo and Spooky are often cited as the quintessential slot canyon hikes in Utah that you can do without a guide, since they require no technical ropes – just a spirit of fun and a willingness to get a bit dirty.
- Permits/Fee: No permits required for day hiking. There is a free register at the trailhead – sign in for safety. No fees to park or hike. The biggest “cost” is the rough drive to get there (high-clearance recommended). Always check at the Escalante Interagency Visitor Center for road conditions and flash flood status before heading out. If thunderstorms threaten, do not enter the slots – wait for a safer day. Cell service is zero out there, so plan accordingly.
Strenuous: Coyote Gulch (Backcountry Escalante Canyon)
- Length: ~11 miles round trip minimum (varies by route; could be 11–26+ miles depending on itinerary, often done as overnight backpack)
- Difficulty: Strenuous (long distance, some route finding, and requires wading in a stream. Usually done as an overnight trip, but extremely strong hikers sometimes do a very long day hike.)
- Best Seasons: Spring and fall. Coyote Gulch is best avoided in the hottest part of summer due to heat and in monsoon season due to flash flood risk. Late fall can be gorgeous with cottonwood trees turning gold. In spring, water flow is decent and temperatures mild.
- What to Bring: This is a wilderness trip – bring topographic maps or GPS navigation, as there are multiple entry points and few signs. If day hiking from a trailhead like Hurricane Wash: bring 4+ liters of water (though the creek is present, filtration is needed and some sources have biological risks; many filter or treat water from Coyote Gulch if backpacking). Sturdy boots or trekking sandals (you will be walking in the water quite a bit). Dry socks/shoes for camp if overnight. Sun protection for the exposed portions hiking in. A climbing rope or webbing if attempting the Sneak Route in or out (a specific steep entry that requires a handline). Permits are required for overnight use (free but required) – get one from the Escalante ranger station.
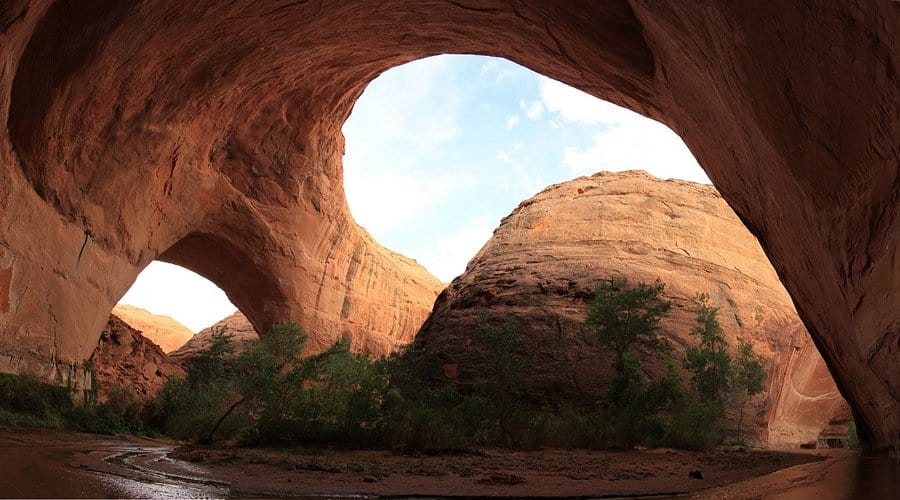
- Notable Features: Coyote Gulch is often described as one of the most beautiful canyon hikes in Utah. It features a bit of everything: a clear perennial stream, towering red rock walls that arch overhead, lush greenery, and even waterfalls and arches. This is a longer adventure usually. A common way is to start at Hurricane Wash trailhead: you hike several miles of open wash (flat, somewhat unremarkable) before entering the gulch proper where water starts flowing. Once in Coyote Gulch, you’ll be walking downstream – sometimes on sandy banks, sometimes in the shallow creek itself. You’ll pass under Jacob Hamblin Arch, a massive open-span arch right in the canyon (you can’t miss it; it’s a great lunch or camp spot). Further on is Coyote Natural Bridge, a rock bridge over the creek that you actually walk under. There are also small cascades and ledges where the water falls gently, and side canyons to explore. Many backpack and spend a night or two exploring deeper to where Coyote Gulch meets the Escalante River (and there’s a 130-foot Escalante Natural Bridge near the confluence, plus petroglyphs, and Steven’s Arch high above the Escalante). As a day hike, one could potentially go to Jacob Hamblin Arch and back (~14 miles round trip) which is very strenuous but achievable in a long day for fit hikers. Most prefer an overnight to savor it. If you’re not up for that length, Coyote Gulch might be one to dream about for a future trip. But it’s included here because it truly offers the ultimate Escalante slot canyon experience short of technical canyoneering. Notable challenges: quicksand patches (rare but can happen), possible encounters with snakes, and the sheer remoteness – you must be self-sufficient. If you do go, you will likely rank it among your top hiking experiences ever.
- Permits/Fee: Permit required for overnight trips (available at visitor center or self-issue, no fee) – it helps limit impact. For day hike, no permit is needed, but you should sign any trail registers. No entrance fee. Reaching the trailheads involves long dirt roads; some (like Redwell or Crack-in-the-Wall routes) require high-clearance vehicles and careful navigation to the drop-in points. Always inform someone of your plans – this is true wilderness.
Other Escalante Area Hikes: If you want a family-friendly slot canyon alternative, Willis Creek Narrows (in Grand Staircase, near Cannonville) is an easy slot canyon hike with trickling water – great for kids, about 3 miles round trip and mostly flat. Another popular moderate hike is Escalante River Trail to Upper Calf Creek Falls or to Escalante Natural Bridge – there are several access hikes along HWY 12 and Hole-in-the-Rock Road, depending on what features you want to see. And for the truly bucket-list adventurers, The Wave in nearby Vermilion Cliffs (just over the border in Arizona) is world-famous – but requires winning a difficult permit lottery (only ~64 people per day). If you can’t get The Wave, White Pocket (no permit) or Buckskin Gulch (permit required but easier to get) are other incredible experiences in the Paria region on the Utah/Arizona border. The Grand Staircase–Escalante area is massive and untamed – perfect for those looking to go beyond the national parks.
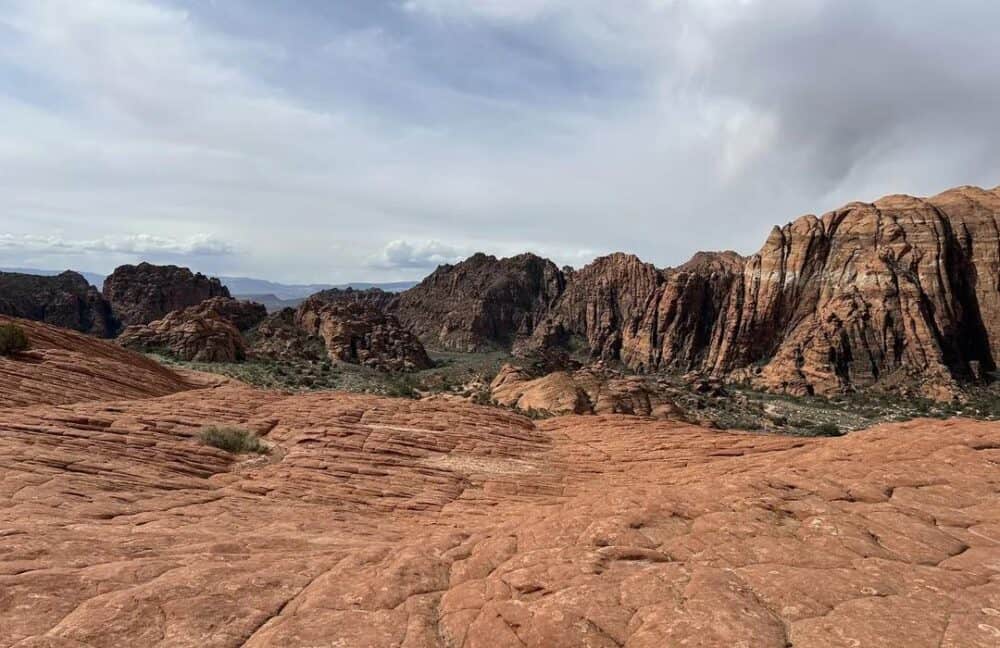
Snow Canyon State Park (Southwest Utah, St. George Area)
Snow Canyon State Park is a lesser-known gem located just outside St. George, UT. It’s a miniature version of Utah’s red rock beauty, featuring petrified sand dunes, lava flows and tubes, and colorful Navajo sandstone cliffs. The park is much smaller in scale than the national parks, but has a nice network of short trails ideal for families and those who want scenic hikes without big mileage.
Best seasons: Fall, winter, and spring. Snow Canyon is in the low desert (like nearby St. George), so summers are very hot (100°F+ common) – morning or evening hikes are necessary in summer. Spring brings wildflowers and mild weather; fall has warm days and cool nights. Winter is generally sunny and cool (snow is rare and melts quickly).
What to bring: Water, even on short hikes – this is desert environment and can be deceivingly hot. Sunscreen and a hat; much of Snow Canyon is exposed slickrock and sand, reflecting the sun. Good shoes (some trails involve walking on slickrock or across loose sand). The state park charges a modest entrance fee per vehicle at the gate.
Trails in Snow Canyon range from a few hundred yards to about 8 miles. Here are a few by difficulty:
Easy: Jenny’s Canyon Trail
- Length: 0.5 mile round trip
- Difficulty: Easy (flat, sandy path into a short slot canyon)
- Best Seasons: Anytime except summer mid-day. It’s very short, so even in summer you could do it quickly (the slot portion offers shade). Note: Jenny’s Canyon is closed annually March 15 to June 1 for wildlife habitat protection (bird nesting) – check current dates on the park website.
- What to Bring: Not much needed – just water and perhaps a camera. It’s so short that flip-flops could do it, but better to wear regular shoes due to sand and a tiny bit of rock.
- Notable Features: Jenny’s Canyon is a kid-favorite because it’s like discovering a secret. A brief walk from the road leads you across a sandy wash and right into a narrow slot canyon cut into the red rock. The slot is only about 100 yards long – you’ll come to the end where you can see high textured walls and sometimes evidence of nesting birds in crevices. There’s also a short side spur that climbs a few steps to a scenic overlook above the slot, giving a view over the park’s southern area. It’s a perfect leg-stretcher and suitable for young children (just watch them on the short climb to the overlook). This little canyon shows that Snow Canyon has its own slot surprises despite being mostly known for open slickrock. Since it’s a quick stop, consider pairing Jenny’s Canyon with other short hikes in the park like Pioneer Names or the Sand Dunes.
- Permits/Fee: No permit needed. Just the park entrance fee (currently about $10 per vehicle for day use). Park at the signed Jenny’s Canyon trailhead along Snow Canyon Drive (south end of the park). Respect the seasonal closure signs – it’s to protect nesting Peregrine falcons or other birds.
Moderate: Petrified Dunes Trail
- Length: ~1.2 miles round trip (out-and-back, or more if you explore)
- Difficulty: Moderate (no significant elevation gain marked, but you will be hiking up and down slickrock “dunes” which can be steep in parts; route is not always obvious but generally you just roam the open rock).
- Best Seasons: October through April. This trail is entirely on sun-baked rock, so avoid mid-day in summer. Cooler days make for a much more enjoyable scramble. Sunset can be beautiful on the petrified dunes, with long shadows highlighting the ripples.
- What to Bring: Good traction shoes (hiking shoes or boots – the slickrock has good grip if dry, but you want reliable soles). Water – even though short, the exertion of going up the domes and the reflective heat of the rock will dehydrate you quickly. It’s a great trail for photography, so bring a camera. No navigational aid needed if you stick to obvious terrain, but note there are fewer trail markers since it’s an open slickrock area (keep the parking lot orientation in mind so you can return).
- Notable Features: The “petrified” dunes in Snow Canyon are ancient sand dunes turned to stone, now exposed and eroded into wave-like mounds. This trail lets you wander freely on these swirling red and orange slickrock hills. It’s like walking on frozen sand waves. Kids and adults alike enjoy picking their own path up and over the humps – it’s a bit of a choose-your-own-adventure. There are wonderful views of the canyon’s rock formations from the high points of the dunes. In the distance to the north, you’ll see the towering white and orange cliffs that frame Snow Canyon. To the west, black lava rock contrasts against the red sandstone. You might notice little potholes (weathering pits) in the rock that sometimes hold water after rain – mini oases for tiny creatures. Because there isn’t a single defined end point, many people scramble out as far as they feel comfortable, then head back. The typical turnaround is when the dunes start sloping down toward the west and the trail meets the end of the marked route or connects with other trails. It’s a great spot to just sit and take in the scenery. Desert hiking safety is key here: remember that on these open rocks temperatures can feel hotter; carry that water and wear a hat. Also, be sure to avoid stepping on any vegetated patches or crypto-biotic soil crusts on the edges – stick to the rock or sand. Overall, Petrified Dunes is a highlight of Snow Canyon, showing off the park’s unique geology in a fun, hands-on way.
- Permits/Fee: No permit needed, just park entry fee. Trailhead is a parking area along the main road (between the south and north entrances). There is a trail sign, but after that you follow cairns and your instincts across the slickrock. It’s virtually impossible to get truly lost if you stay on the broad rock expanses, but pay attention to not wander into closed areas (signs will indicate if an area is off-limits to protect wildlife or plants).
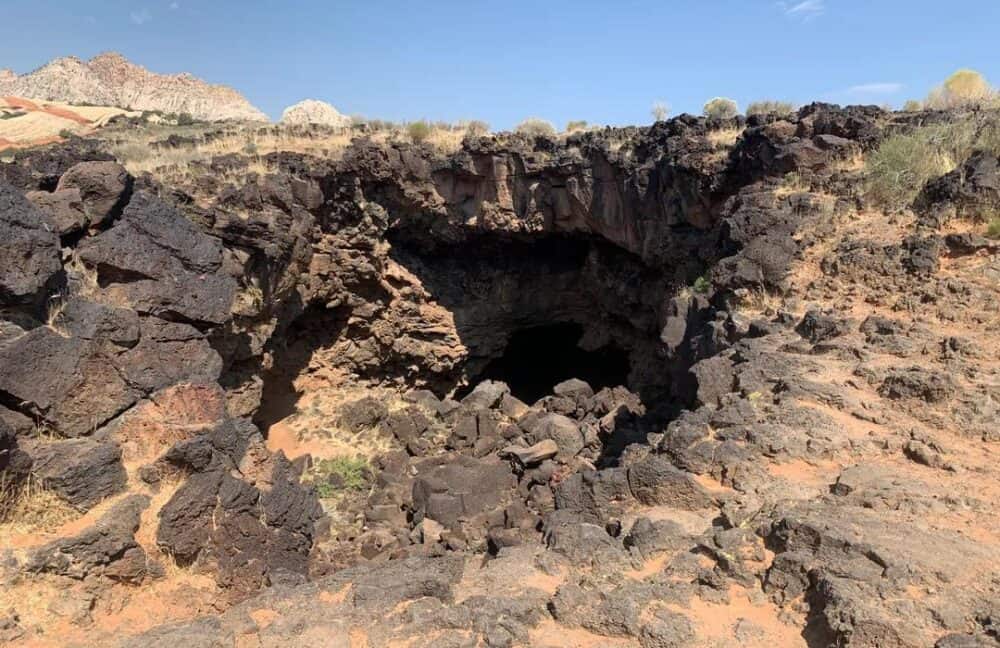
Strenuous: Lava Flow Trail and West Canyon Overlook (Loop)
- Length: ~4 miles round trip (combining Lava Flow, a portion of White Rocks trail, and West Canyon overlook spur)
- Difficulty: Moderate to Strenuous (sections of lava rock are rough and uneven, and there is some elevation gain to the overlook; not a maintained loop officially, but commonly done).
- Best Seasons: Fall through spring. This route gives a sampling of different terrains – lava tubes are cool to explore especially on a warm day. Avoid high summer unless early morning. After rain, lava rocks can be slick.
- What to Bring: Sturdy closed-toe shoes – lava rock is sharp and will chew up flimsy footwear. A headlamp or flashlight if you plan to explore inside a lava tube (there are a couple of lava caves along the Lava Flow trail – dark inside and fun to check out). Bring water and snacks. Perhaps a light jacket or long sleeves for the lava tube (they can be cooler inside).
- Notable Features: Snow Canyon isn’t all red rocks; it also has fields of black lava from extinct volcanoes. The Lava Flow Trail starts near the campground and winds through jagged basalt rock fields. You’ll see signs for lava tube entrances – these are like caves formed by flowing lava. You can carefully climb down metal ladders or scramble into a couple of them (bring that light!) to see underground chambers where lava once rushed (kids love this, but keep them close – don’t let anyone explore caves alone). Continuing on the trail, you’ll transition onto sandstone again and can connect toward West Canyon Overlook – a spur that climbs to a viewpoint over the broad West Canyon. This uphill segment is a bit strenuous on tired legs, but at the top you get a nice vista of the whole park: petrified dunes, white cliffs, dark lava flows, and the green valley below. Return by looping back along a connecting trail or the park road to the Lava Flow parking. The variety on this hike – lava tubes, sand, slickrock, and panoramic views – showcases Snow Canyon’s multi-faceted landscape. It’s a great half-day adventure. If you want something shorter, you could just do Lava Flow trail out-and-back to see one lava tube (~2 miles RT), which many consider an easy family hike. But adding the overlook makes it more of a workout and yields the reward of a big view.
- Permits/Fee: No permit needed. Just the park day-use fee. Maps at the trailhead show the network of trails. Note that West Canyon itself is an unpaved service road open to hiking/biking; the overlook trail spurs off from Whiterocks Trail. Rangers at the gate can provide a brochure with a map of all trails to help you make this loop.
(Snow Canyon Bonus: If you have time in the evening, drive out of the park a bit and look for a spot to stargaze. Snow Canyon is designated as a Dark Sky Park – the stargazing on a clear night is excellent once the day-use visitors have gone and lights are low.)
Red Cliffs Desert Reserve (St. George Area)
The Red Cliffs Desert Reserve is a large protected area in Washington County that includes various habitats from lowland desert to upland slopes. It was established to protect the desert tortoise and other species, but it doubles as a fantastic recreation area with many trails. Parts of the Reserve overlap with Snow Canyon and other state lands, but here we’ll focus on the Red Cliffs Recreation Area and nearby trails often collectively called “Red Cliffs.” This area, north of St. George near Leeds and Washington, UT, is known for red rock canyons, a small slot with a seasonal waterfall, and ancient tracks and petroglyphs.
Best seasons: Spring is ideal (flowing water in canyons, wildflowers). Fall is great too. Winter can be chilly but generally mild (and nice for hiking). Summer can reach 100°F+, so aim for morning or water hikes.
What to bring: If hiking in the main Red Cliffs canyon (Red Reef trail), wear shoes that can get wet (in spring there are pools of water). Otherwise, usual desert essentials: water, sun protection, sturdy shoes for rocky sections. A map or trail app is useful because some trails intersect or aren’t super clearly marked in the Reserve.
Trails here are generally short to moderate. Our picks:
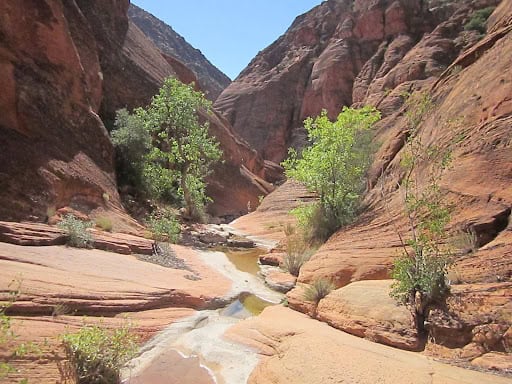
Easy: Red Reef Trail (Red Cliffs Recreation Area)
- Length: ~2.2 miles round trip (to reach the small waterfalls and back)
- Difficulty: Easy for first 0.5 mile, becoming moderate if you continue past the waterfall (there is an 8-foot rock wall with moki steps and rope to climb if water is low). Many families turn around at the waterfall and pools.
- Best Seasons: Spring is the best – Quail Creek flows, creating pools and a little waterfall in this narrow canyon, and the desert around is green. Summer the stream often dries up (or is just a trickle), so the “falls” might be dry; still a pretty canyon but less exciting for kids without water. Fall can have some water if late monsoons. Avoid if heavy rain forecast (flash floods possible).
- What to Bring: Water for drinking (there’s no potable water once on trail). Water shoes or sandals can be nice if you want to splash in the creek or pools, but you also need shoes with grip to climb the rock if you go past the first falls. Many just hike in normal shoes and maybe get a bit wet. If bringing kids, perhaps a towel or change of clothes if they plan to romp in the water. A small rope or cord could be helpful to haul a backpack up the 8-ft wall if you attempt it. Also, cash for the day-use fee – the recreation area charges around $5 per vehicle.
- Notable Features: This trail is a local favorite, often just called “Red Cliffs Trail” or “Red Reef hike.” It starts at the Red Cliffs Campground and follows a pretty little canyon (sometimes called Red Reef or Quail Creek) beneath towering red sandstone walls. In springtime, the creek flows alongside the trail, and you’ll see lush vegetation and maybe even wildflowers. About a half-mile in, you come to a spot where the canyon narrows and water has carved out pools and a small slot. There’s usually a little waterfall pouring into a pool here. On the right side of the falls, look for Moki steps (footholds) carved into the rock with a rope to help – you can climb up and continue further into the canyon. This is a fun challenge (most moderately fit people can do it, and kids with a boost – but be careful if the rock is wet and slippery). Even if you don’t climb up, the lower pools are a fun play area; kids often wade and catch tadpoles in spring. If you do climb: above, you’ll find more gorgeous Navajo sandstone scenery. Another quarter mile on, there’s a second taller waterfall pouring over a huge chockstone (boulder) in the canyon – usually around 1.7 miles in. Most hikers stop there, as climbing past that would require technical canyoneering. You might spot frog petroglyphs etched on the rock wall near the lower falls if you look carefully. Also, watch for dinosaur tracks – there are some in the area (ask a ranger or look for signage). It’s amazing how much is packed in this short canyon: red rock narrows, water fun, pictographs/petroglyphs, and tracks. This is absolutely a family-friendly hike and often one of the first introductions locals have to slot-like canyons.
- Permits/Fee: No permit required for hiking. But this is within the Red Cliffs Recreation Area campground, which charges a day-use fee (collected at a self-pay station, or honor system if nobody at gate). America the Beautiful (National Park) Pass is accepted here as well. Parking is limited near the trailhead; if full, you may have to park outside the campground and walk a short bit in. Dogs are allowed on leash on this trail. One more note: The access road under I-15 can flood after heavy rain, so check conditions if it’s been stormy.
Moderate: Elephant Arch Trail
- Length: ~3.8 miles round trip
- Difficulty: Moderate (primarily due to sections of deep sand which can be tiring, and a gentle uphill to the arch. Not much shade.)
- Best Seasons: Fall, winter, spring. This trail is down in the flats near Washington City – very hot in summer with no water. Cooler months are great. Also, early morning or sunset times can be beautiful with the colors on the rocks.
- What to Bring: Good walking shoes (you’ll be in sand and on some rocks near the arch). Plenty of water – this hike is exposed and those sandy stretches can make you feel the heat more. Maybe a gaiter or tall socks if you don’t like sand in your shoes. A hat and sunscreen, definitely. No special gear needed beyond that.
- Notable Features: Elephant Arch is a quirky sandstone arch that, from the right angle, looks a bit like the head of an elephant with a trunk (hence the name). The hike to get there is a pleasant walk through the desert in the Red Cliffs Reserve. You start at the Mill Creek trailhead in the Washington City area. The first part follows a dirt double-track then a single-track through a desert wash (a dry streambed). Expect to walk through soft sand for a good portion – it’s like walking on a beach, which gives your calves a little workout. Along the way, enjoy the desert tranquility: you might see lizards, hear cactus wrens chirping, and in spring, see wildflowers or blooming cactus. After about 1.5 miles, you enter a pretty red rock canyon section (minor rock hopping) and soon spot Elephant Arch tucked up in the cliffs. A short spur leads right up under the arch. It’s not gigantic, but it’s a neat formation with a clear arch shape and a “trunk” formation descending from one side. Great spot for a photo op. The surrounding alcove also offers a bit of shade – nice for a break. Because of the sand, this hike is moderately challenging (feels longer than 3.8 miles), but technically it’s not difficult. Families do hike it; just be prepared to piggy-back little ones through sand. This is a trail where you likely won’t see many others, especially on weekdays – a peaceful desert escape just outside town.
- Permits/Fee: No fees, no permits. The trailhead has no fee and is outside the developed recreation area. Just respect the Reserve rules (stay on trail to protect the habitat, especially since this is protected tortoise habitat – you might see signs about that). If you bring a dog, note that dogs must be leashed (for the wildlife’s sake and your dog’s safety due to potential rattlesnakes in warm weather).
(Bonus in Red Cliffs Reserve: If you’re up for a more strenuous trek, the Red Mountain Trail from Ivins up to Snow Canyon Overlook is about 5 miles round trip and moderately steep – it gives a top-down view into Snow Canyon that’s truly breathtaking, especially at sunrise. No fees or permits for that either, since it starts on BLM land outside the park.)
Other Noteworthy Southern Utah Hikes
Beyond the major parks and reserves, Southern Utah has countless hikes. Here are a few more notable ones that don’t fit neatly into the above regions but deserve a mention, especially if you’re looking to expand your itinerary or seek alternatives:
Kanarra Falls (Kanarraville Slot Canyon near Cedar City)
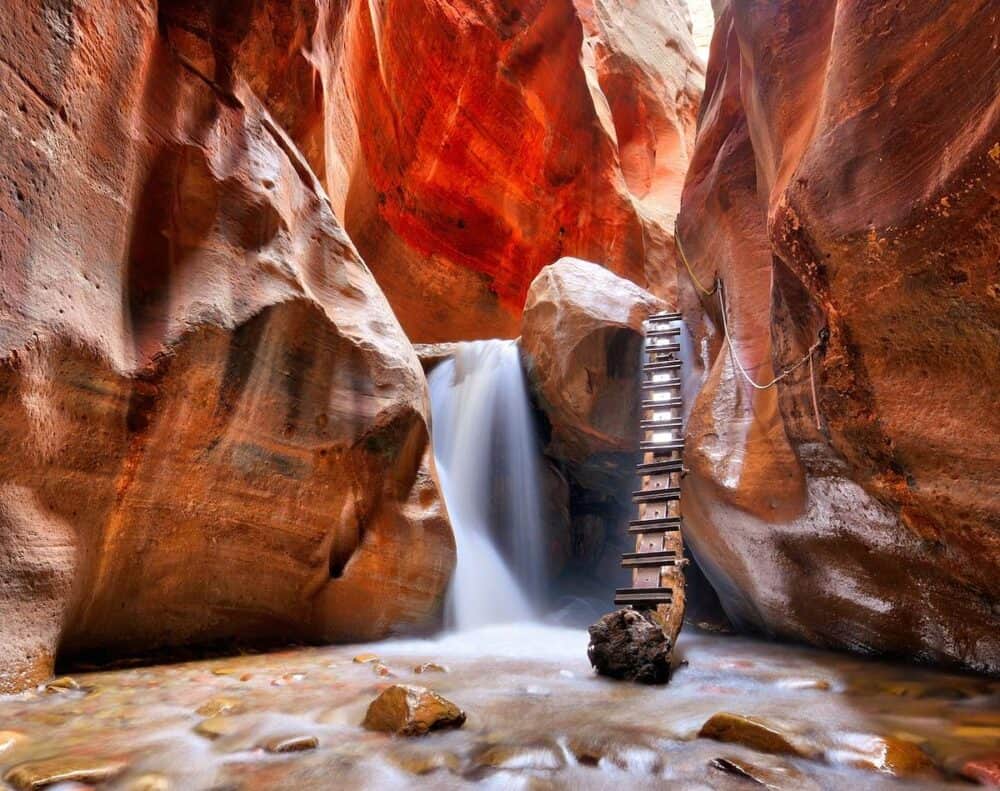
- Length: ~4.0 miles round trip
- Difficulty: Moderate (involves hiking in a shallow creek and climbing a ladder by a waterfall; trail has about 700 ft elevation gain overall).
- Best Seasons: Late spring through early fall. Summer is popular because walking in water is refreshing. Avoid during spring snowmelt (April-May) when water levels can be high and cold. In winter, the canyon can freeze, making it dangerous. Go on a warm day for best experience.
- What to Bring: Permit – required (limited to ~180 people per day), purchase online in advance (about $15 per person). Neoprene socks or water shoes are nice since you will be in and out of the creek often. Regular hiking shoes that you don’t mind getting wet also work (they’ll dry later). A small daypack to carry water, snacks, and maybe a dry layer. Avoid heavy backpacks (they make balancing on ladders harder).
- Notable Features: Kanarra Falls is a beautiful slot canyon hike with multiple waterfalls and is sometimes called a mini-Narrows. Located just south of Cedar Canyon, the hike starts on a dirt road and then a trail that soon drops you into Kanarra Creek. You’ll follow (and frequently cross) the creek as the red canyon walls start to close in. In summer, expect to be walking right in the water for stretches (which feels great). After about 1.5 miles, you reach the first waterfall – a photogenic chute within a narrow slot, about 15 feet tall, with a sturdy metal ladder bolted beside it so hikers can climb up. This is a thrilling spot (and the main highlight for many). The ladder can be wet and slippery – take turns and hold the fixed rope or rails. Above, continue a bit further to a second waterfall which requires climbing over a boulder or using a rope (if one is in place). Most people turn around at this second falls. The experience of climbing a ladder in a tight slot with water rushing is unforgettable, and kids (minimum age 8 per permit rules) find it very adventurous. Because of the permit system, the crowd is managed, but it still can be busy on weekends – the plus side is you’ll likely have help from others if needed. This hike combines the elements of a slot canyon, cool water, and waterfalls in one package. Safety tip: Always check weather – even with permits, you must self-assess conditions. Flash floods could occur if storms are in the area. Rangers may close the canyon if weather is risky, so pay attention to local conditions.
- Permits/Fee: Yes, permits required. Purchase online for a specific date (often sells out on summer weekends). They have increased the quota a bit in recent years but still limited. Check KanarraFalls.com for info. Parking is included with the permit – park at the trailhead lot in Kanarraville. No walk-ins without permit are allowed, and they do check names. This system has been in place to reduce overuse in the canyon and preserve the experience.
Little Wild Horse Canyon (San Rafael Swell, near Goblin Valley)

- Length: 8 miles round trip (if doing the full loop with Bell Canyon); can shorten by doing out-and-back in Little Wild Horse, even 2–4 miles RT to see the best narrows.
- Difficulty: Moderate (the slot itself is non-technical but involves some scrambling over small obstacles; the full loop is long but relatively flat, about 700 ft total gain across 8 miles).
- Best Seasons: Spring and fall. This area is central/southern Utah desert – hot in summer, though the slot offers shade. Avoid during rain/flash flood risk. Very popular during spring break season.
- What to Bring: No permit needed, but there’s a sign-in at trailhead. Water (at least 2 liters for partial, 3+ if doing loop). Sturdy shoes for walking on rock and gravel. Perhaps knee pads for kids (lots of opportunity to crawl or slide on slot canyon walls for fun). A headlamp isn’t needed (slots are not extremely dark). Map or knowledge of loop junction if doing the loop (though it’s well-traveled).
- Notable Features: Little Wild Horse Canyon is often touted as one of the most family-friendly slot canyon hikes in Utah. Located near Goblin Valley State Park, it’s free to hike and offers nearly continuous slot canyon twists and turns. Many hikers just go up Little Wild Horse as far as the narrows go (about 1.5–2 miles one way of beautiful slot, then turn back), rather than doing the whole loop with Bell Canyon. In Little Wild Horse, you will encounter narrows where you can touch both walls, pretty striped patterns in the sandstone, and occasional minor obstacles (like small dryfalls you climb up). It’s like a Disneyland for hikers – lots of fun constrictions to wiggle through, but nothing too dangerous in good weather. Children and adults alike find it enjoyable (just watch children closely in any spots where a fall could occur). If you do the loop: after exiting Little Wild Horse, you’ll cross open desert for about 1.6 miles, then descend Bell Canyon which is wider and less dramatic, but still pleasant. The loop brings variety, but the wow is definitely Little Wild Horse itself. Plan on 3-4 hours for the out-and-back of LWH, and 5-6 hours for the full loop. It’s a fantastic introduction to slot canyons without requiring technical skills.
- Permits/Fee: No permits. Parking is at the trailhead just outside Goblin Valley State Park (no fee to park here, unlike inside Goblin Valley where there is a fee). There are pit toilets at trailhead. Check with Utah BLM for any recent conditions; in rare cases, floods can deposit debris or make some parts harder. Generally, it’s open and ready for hikers. Many combine this with a visit to Goblin Valley (state park fee required there) on the same day.
These additional hikes show that no matter where you go in Southern Utah, there’s a trail waiting to be explored – whether it’s a cool slot canyon off the beaten path or a famous bucket-list trek.
Conclusion
Southern Utah is a hiker’s paradise. From the iconic national parks of Zion, Bryce, Arches, Canyonlands, and Capitol Reef to the hidden corners of Grand Staircase–Escalante, Snow Canyon, and Red Cliffs, this region offers trails for every type of hiker. Whether you’re seeking family-friendly hikes on paved paths or challenging backcountry routes through slots and arches, you’ll find a remarkable range of experiences under the desert sun. Remember that with the beauty of the desert comes responsibility: practice desert hiking safety – carry ample water, wear sun protection, watch the weather (especially in slot canyons), and leave no trace of your visit. Many of these areas are fragile environments where a little preparation and care go a long way in ensuring a safe, enjoyable hike.
As you plan your trip, consider the best seasons for each hike and any permit requirements. Try mixing different regions to appreciate Southern Utah’s diversity – for example, you might do a couple of Zion hikes, then drive up to Bryce for a cooler high-elevation trek, then out to Escalante for a slot canyon adventure. Each region has its own flavor, but all share the enchanting qualities of Utah’s canyon country: starry nights, radiant red-rock vistas, and the kind of moments that make you stop in your tracks and simply say, “wow.”
We hope this regional guide to Southern Utah hikes helps you chart an itinerary that suits your interests and abilities. Now lace up those boots, pack your backpack, and get out there – the trails of Southern Utah are calling, ready to offer you memories and views you’ll treasure for a lifetime. Happy hiking!
Southern Utah Hikes FAQs
Q1: What are the best family-friendly hikes in Southern Utah?
A: There are many great options for families. In Zion National Park, the Riverside Walk is a flat, easy stroll along the river suitable for strollers and kids. Bryce Canyon’s Mossy Cave Trail is short and fun with a small waterfall. Outside the national parks, Little Wild Horse Canyon is often called one of the best family-friendly slot canyon hikes – it’s mostly easy walking with some fun narrow passages (kids love it, but keep an eye on them). Red Reef Trail in Red Cliffs Reserve is another family favorite, featuring a small waterfall and shallow pools to splash in during spring. And in Snow Canyon State Park, Jenny’s Canyon (a short slot) and the Sand Dunes area (where kids can play in soft sand) are big hits. Always bring water and sun protection for the little ones, and choose hikes that match your family’s ability.
Q2: Do I need permits for any hikes in Southern Utah?
A: Yes, a few popular hikes require permits. In Zion, Angel’s Landing now requires a permit obtained via lottery due to safety and crowd concerns. Also in Zion, if you plan to do the top-down Narrows through-hike (16 miles), you need a permit (not needed for the bottom-up day hike to Big Spring).
Outside Zion, Kanarra Falls is a permitted hike – you must purchase a limited-entry ticket online for a specific day. The Wave (on the UT/AZ border) is another famous example, though it’s technically in Arizona – permits are extremely competitive. Most other hikes in national parks (like those in Bryce, Arches, Canyonlands, Capitol Reef) do not require permits for day hiking. Grand Staircase–Escalante hikes generally don’t require permits either (except if you’re backpacking overnight or visiting certain sensitive areas). Always check the latest park or BLM info, as permit systems can change. And remember, even if no permit, entry fees to parks or day-use fees might apply in some places.
Q3: When is the best time of year to hike in Southern Utah?
A: The spring (April–June) and fall (September–October) are generally the best overall. Spring offers wildflowers and flowing waterfalls/creeks (like Calf Creek Falls or Kanarra Creek), but be mindful of spring snowmelt making some slots colder or riskier. Fall offers beautiful colors (golden cottonwoods in canyons) and mostly stable weather. Summer can be very hot, especially in lower elevations (Zion, Arches, Moab area often see 95–105°F). If summer is your only time, plan to hike early in the morning or late afternoon, and focus on higher elevation parks like Bryce or Cedar Breaks at mid-day, or choose water-filled hikes (like The Narrows, which is popular in summer).
Also, summer brings the monsoon season (July–August) with thunderstorms that can cause flash floods – not the best time for slot canyon hikes unless you have a flexible schedule to go on safe weather days. Winter is off-season for many parks; you can hike, but expect cold nights and occasional snow/ice. Zion’s main canyon stays fairly mild (40s-50s°F) in winter, while Bryce at 8,000+ ft often has snow (which can actually be stunning against the red hoodoos!). Arches and Canyonlands get cold but are usually hikeable with warm layers. So, ideally aim for spring or fall. If going in summer, prioritize safety and consider higher elevations or water hikes.
Q4: What should I pack for hiking in the desert?
A: For any desert hiking in Southern Utah, some essentials include:
Water (carry more than you think you need – a good rule is 1 liter for every 2 hours of hiking at minimum, more if it’s hot; hydration packs are great to sip as you go).
Sun protection – a wide-brimmed hat, sunscreen (SPF 30+ and reapply, the sun is intense), and sunglasses.
Sturdy footwear – trail shoes or hiking boots give good traction on rock and protect your feet; also consider neoprene socks/old sneakers for hikes that involve water (like The Narrows or Kanarra Falls).
Snacks/food for energy, as well as a small first aid kit for blisters or scrapes.
Layers – (like a long-sleeve shirt) can protect from sun and wind; in cooler months or higher elevations, pack an insulating layer and maybe a rain jacket just in case.
Navigation tools -(map, compass, or a hiking GPS app on your phone with downloaded maps) are smart, especially in less marked areas like Escalante – trails can be cairned routes over rock.
Headlamp (if there’s any chance you might be out near dark or want to explore a cave or lava tube).
And don’t forget a camera or your phone for photos – you’ll want to capture these views.
Lastly, a daypack to carry it all comfortably. Many trails have no cell service, so it’s wise to tell someone your hiking plans, especially for remote hikes. By packing these essentials, you’ll be prepared and able to handle the desert’s challenges, keeping your hike safe and enjoyable.
Q5: Are there any safety concerns unique to Southern Utah hikes?
A: Yes, a few worth noting.
Heat and dehydration are the number one concern in warmer months – many visitors underestimate how dry the climate is. Always bring more water than you think you’ll need, and turn around or rest if anyone in your group shows signs of heat exhaustion (dizziness, headache, cramping).
Flash floods are a serious hazard in slot canyons and washes. Even if it’s sunny where you are, a storm upstream can send a flood roaring down a canyon. Check the weather forecast and avoid narrow canyons if thunderstorms are predicted (parks and visitor centers often post flood risk levels).
Wildlife: generally Southern Utah’s wildlife is shy; you might see rattlesnakes, but they avoid humans if not provoked – watch where you put hands and feet, especially in warm months, and give snakes distance if you see one. Don’t approach or feed any wild animals (chipmunks in national parks can carry plague fleas, for example).
Navigation: Some hikes traverse open rock (like petrified dunes or canyon slickrock) where the trail might be marked by rock cairns – pay attention so you don’t get turned around. Carrying a map or GPS is wise in places like the Escalante backcountry.
High elevation: If you’re hiking at Bryce or Cedar Breaks (~8,000-10,000 ft) and you’re not used to altitude, take it slower – shortness of breath or fatigue can hit harder until you acclimate.
Cliffs and drop-offs: Many trails (Angel’s Landing, Canyon Overlook, etc.) have steep drop-offs. Use caution, especially with children – hold hands or keep them away from edges.
Road safety: some trailheads are down dirt roads that require high clearance or 4WD – know your vehicle’s limits and check conditions (for example, Hole-in-the-Rock Road or the road to The Wave trailhead can be rough or muddy). In summary: stay hydrated, respect the power of weather, watch your footing on heights and rough terrain, and you’ll be set for a fantastic and safe adventure in Southern Utah. Enjoy your hikes!
World Traveling Blogger, Social Media Expert and Nerd who has a passion for Adventure and Fitness.